


INSPECTION SECTION 01
Pre-use check or professional servicing?
A lifejacket can look tidy on the outside yet still require servicing. Know which checks are appropriate for the person carrying them out, and follow the instructions for the exact make, model and inflation system.
USER CHECK
A quick check before every use: condition of the cover, straps, buckles, inflation indicators, accessible CO₂ cylinder, expiry information and correct fit. Follow the product's user manual.
COMPETENT INSPECTION
More detailed checks where the manufacturer permits them and the person has the necessary knowledge, tools and procedure. This may involve opening the cover or examining the inflation assembly.
SERVICING
Formal maintenance and testing at the manufacturer's specified interval, and after activation, damage or suspected malfunction. Commercial requirements can be more stringent; approved service stations may be required.
INSPECTION SECTION 02
A four-step check before every use
Start with the complete cover, fastenings and fit. Then check the correct armed-state indicators, accessible cylinder and automatic component, expiry or service dates and any documented defects. These reminders do not replace the checklist for the exact make and model.
01 · LOOK
Inspect the complete lifejacket for damage, contamination, missing components and an improperly closed or distorted cover.
02 · CHECK
Check fastenings, webbing, the cylinder and inflation-unit indicators or expiry information that the manufacturer makes accessible to users.
03 · CONFIRM
Check that the lifejacket is the right type and fit, is correctly armed and packed, and has the required inspection or service status.
04 · RECORD
Where managed using the RISE App, scan the NFC tag to review status, service history and any recorded issues. Report anything new or uncertain.
INSPECTION SECTION 03
Protective cover, closures and inflatable bladder
The outer cover protects the bladder and helps the jacket deploy as designed. Start with a complete visual check before disturbing any closure.
LOOK · Outer cover
Check for tears, cuts, abrasion, scorch marks, mould, chemical or oil contamination, damaged seams, worn fabric, and displaced or twisted material. Inspect zips, hook-and-loop closures and other fasteners.
CHECK · Closure and packing
Make sure the cover is correctly closed, no bladder fabric is trapped in the closure, and the manual pull toggle remains accessible. A swollen, misshapen or partly open cover warrants investigation.
INSIDE · Only when authorised
Where the user manual calls for opening the jacket, check exposed bladder surfaces for abrasion, punctures, cracking, contamination and separation. Do not undertake an inflation or leak test unless instructed and competent.
INSPECTION SECTION 04
Webbing, straps, crotch straps and stitching
Inspect the webbing and stitching that hold the lifejacket on the wearer, including waist and crotch straps. Also look for fraying and damage to protective cover fabric. Distinguish a damaged cover from load-bearing webbing, but never ignore a defect or assume it is harmless.
LOOK · Belt and crotch straps
Check the full length for cuts, fraying, melted fibres, excessive abrasion, UV fading, chemical stains, stiffness, twisting or other changes in the fabric.
FEEL · Adjustment points
Examine the material where it passes through buckles and adjusters. These high-contact areas can hide wear, pulled fibres and creases.
CHECK · Stitching
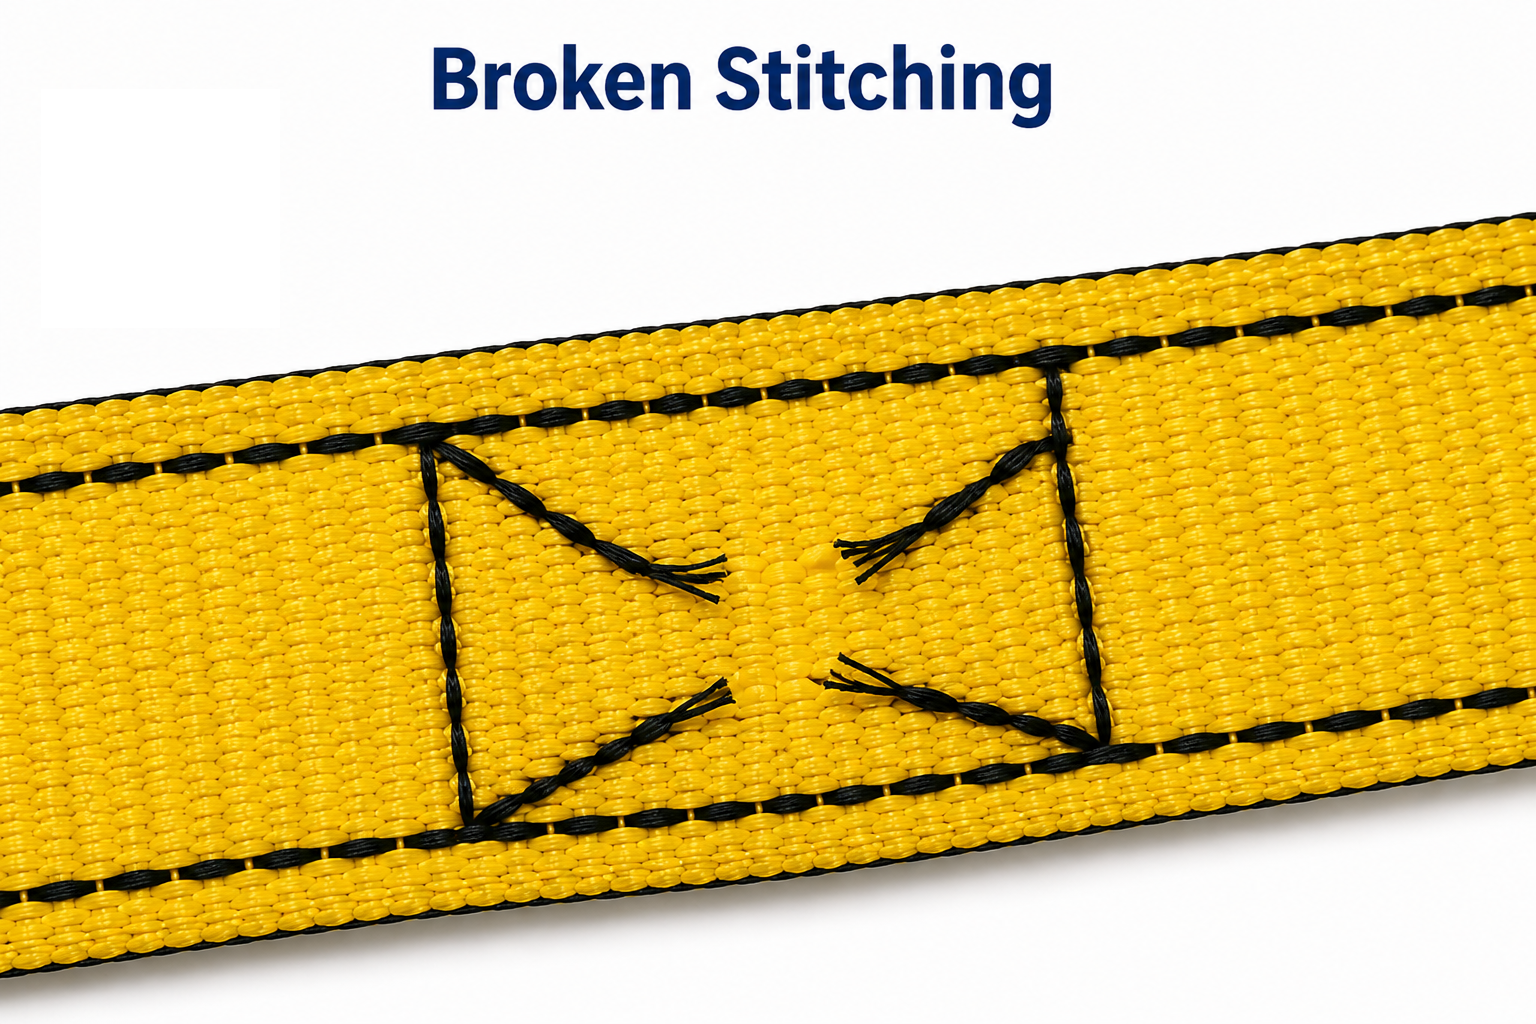
Look for broken, missing, loose, pulled or discoloured thread, especially at load-bearing joins, buckle attachments, crotch straps and lifting points where fitted.
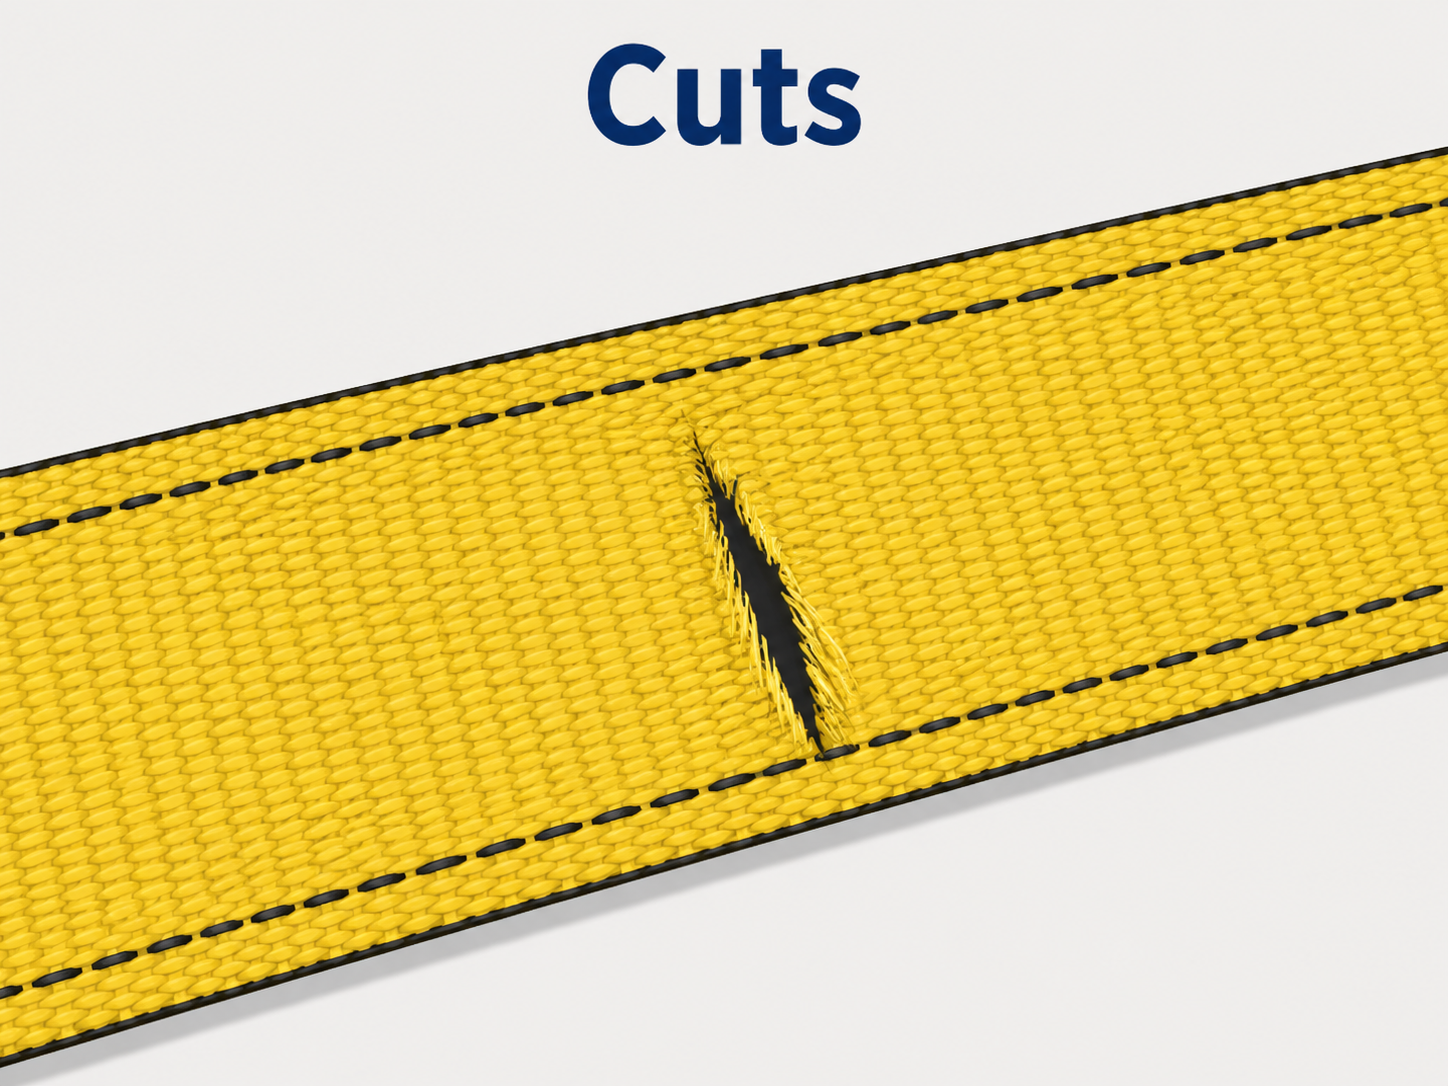
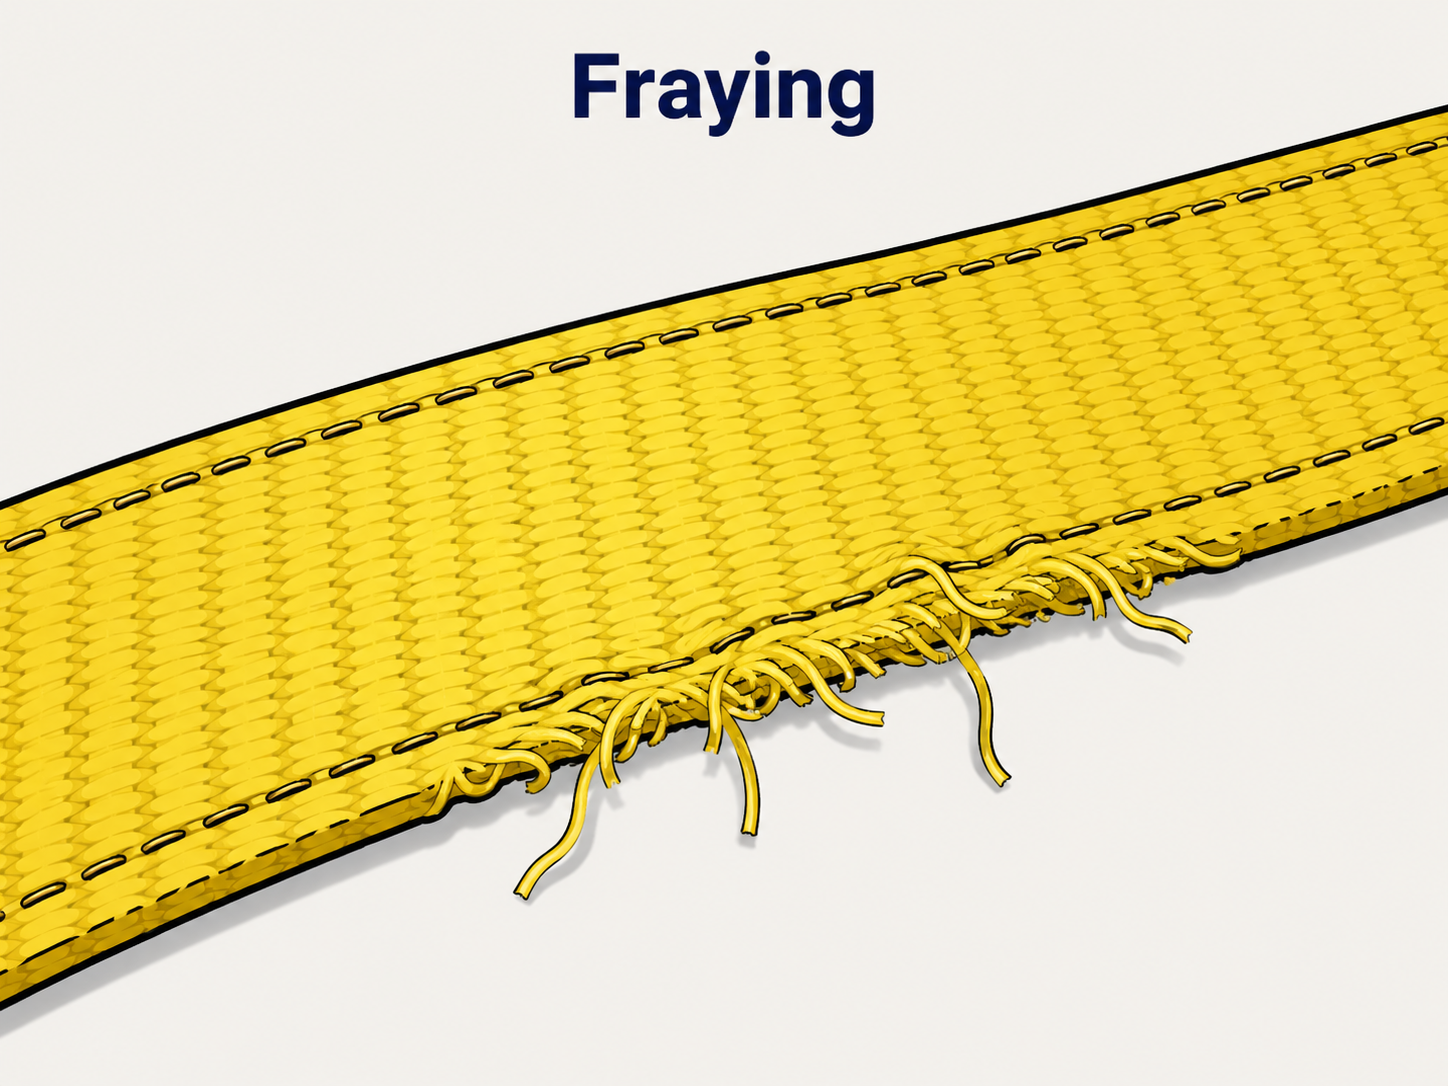
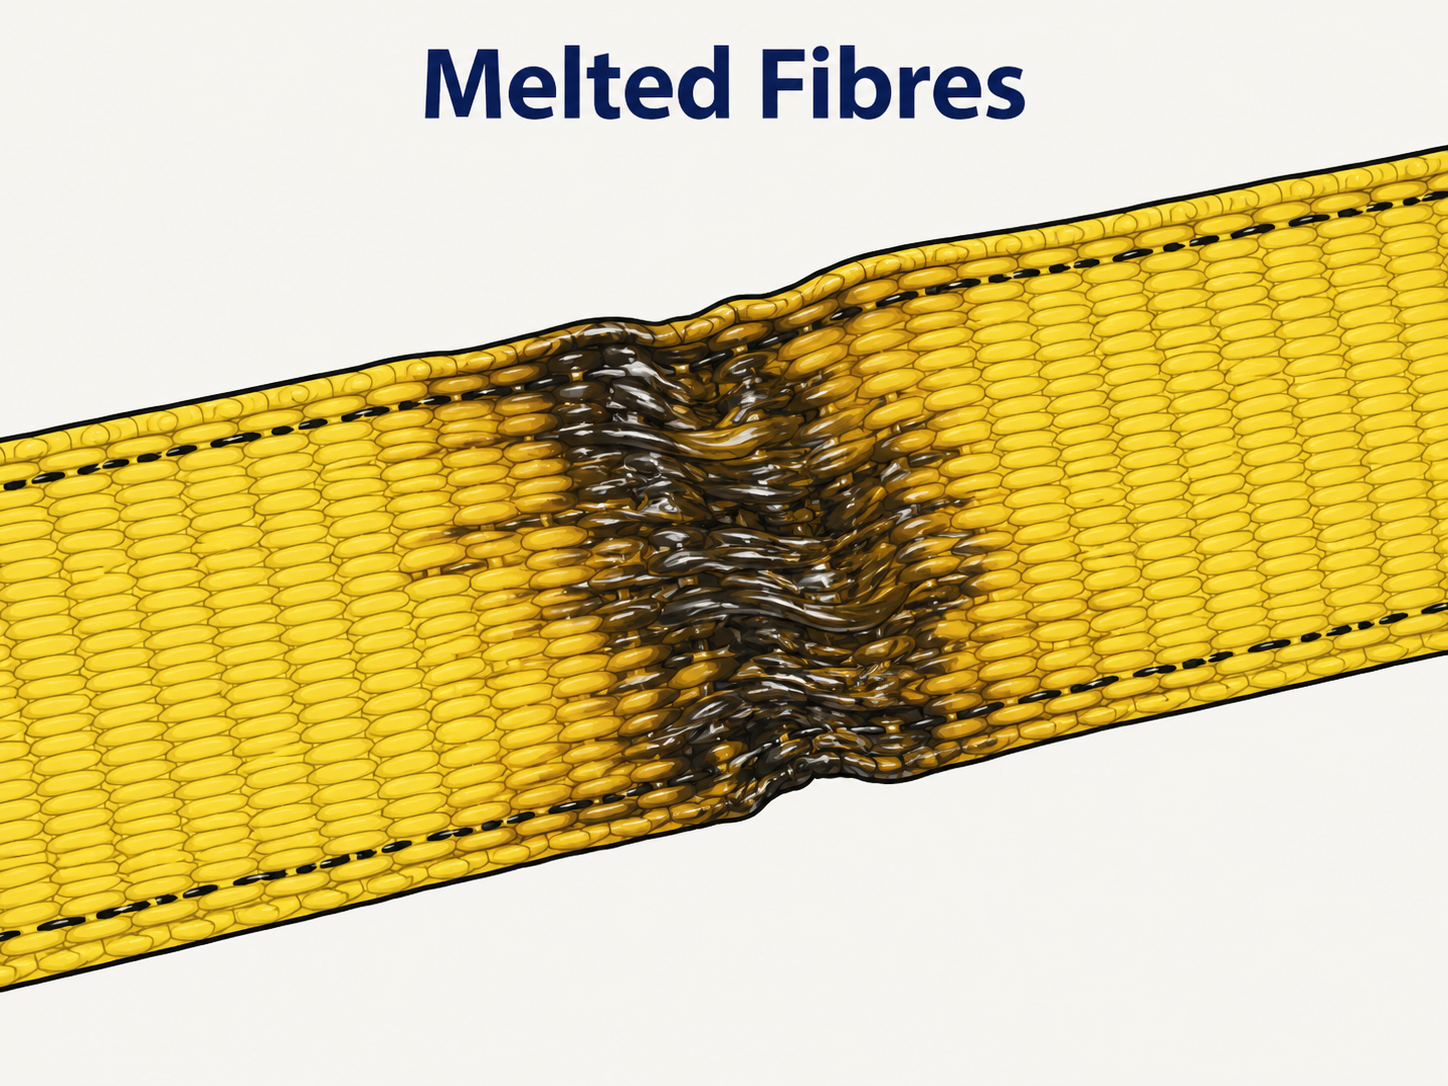
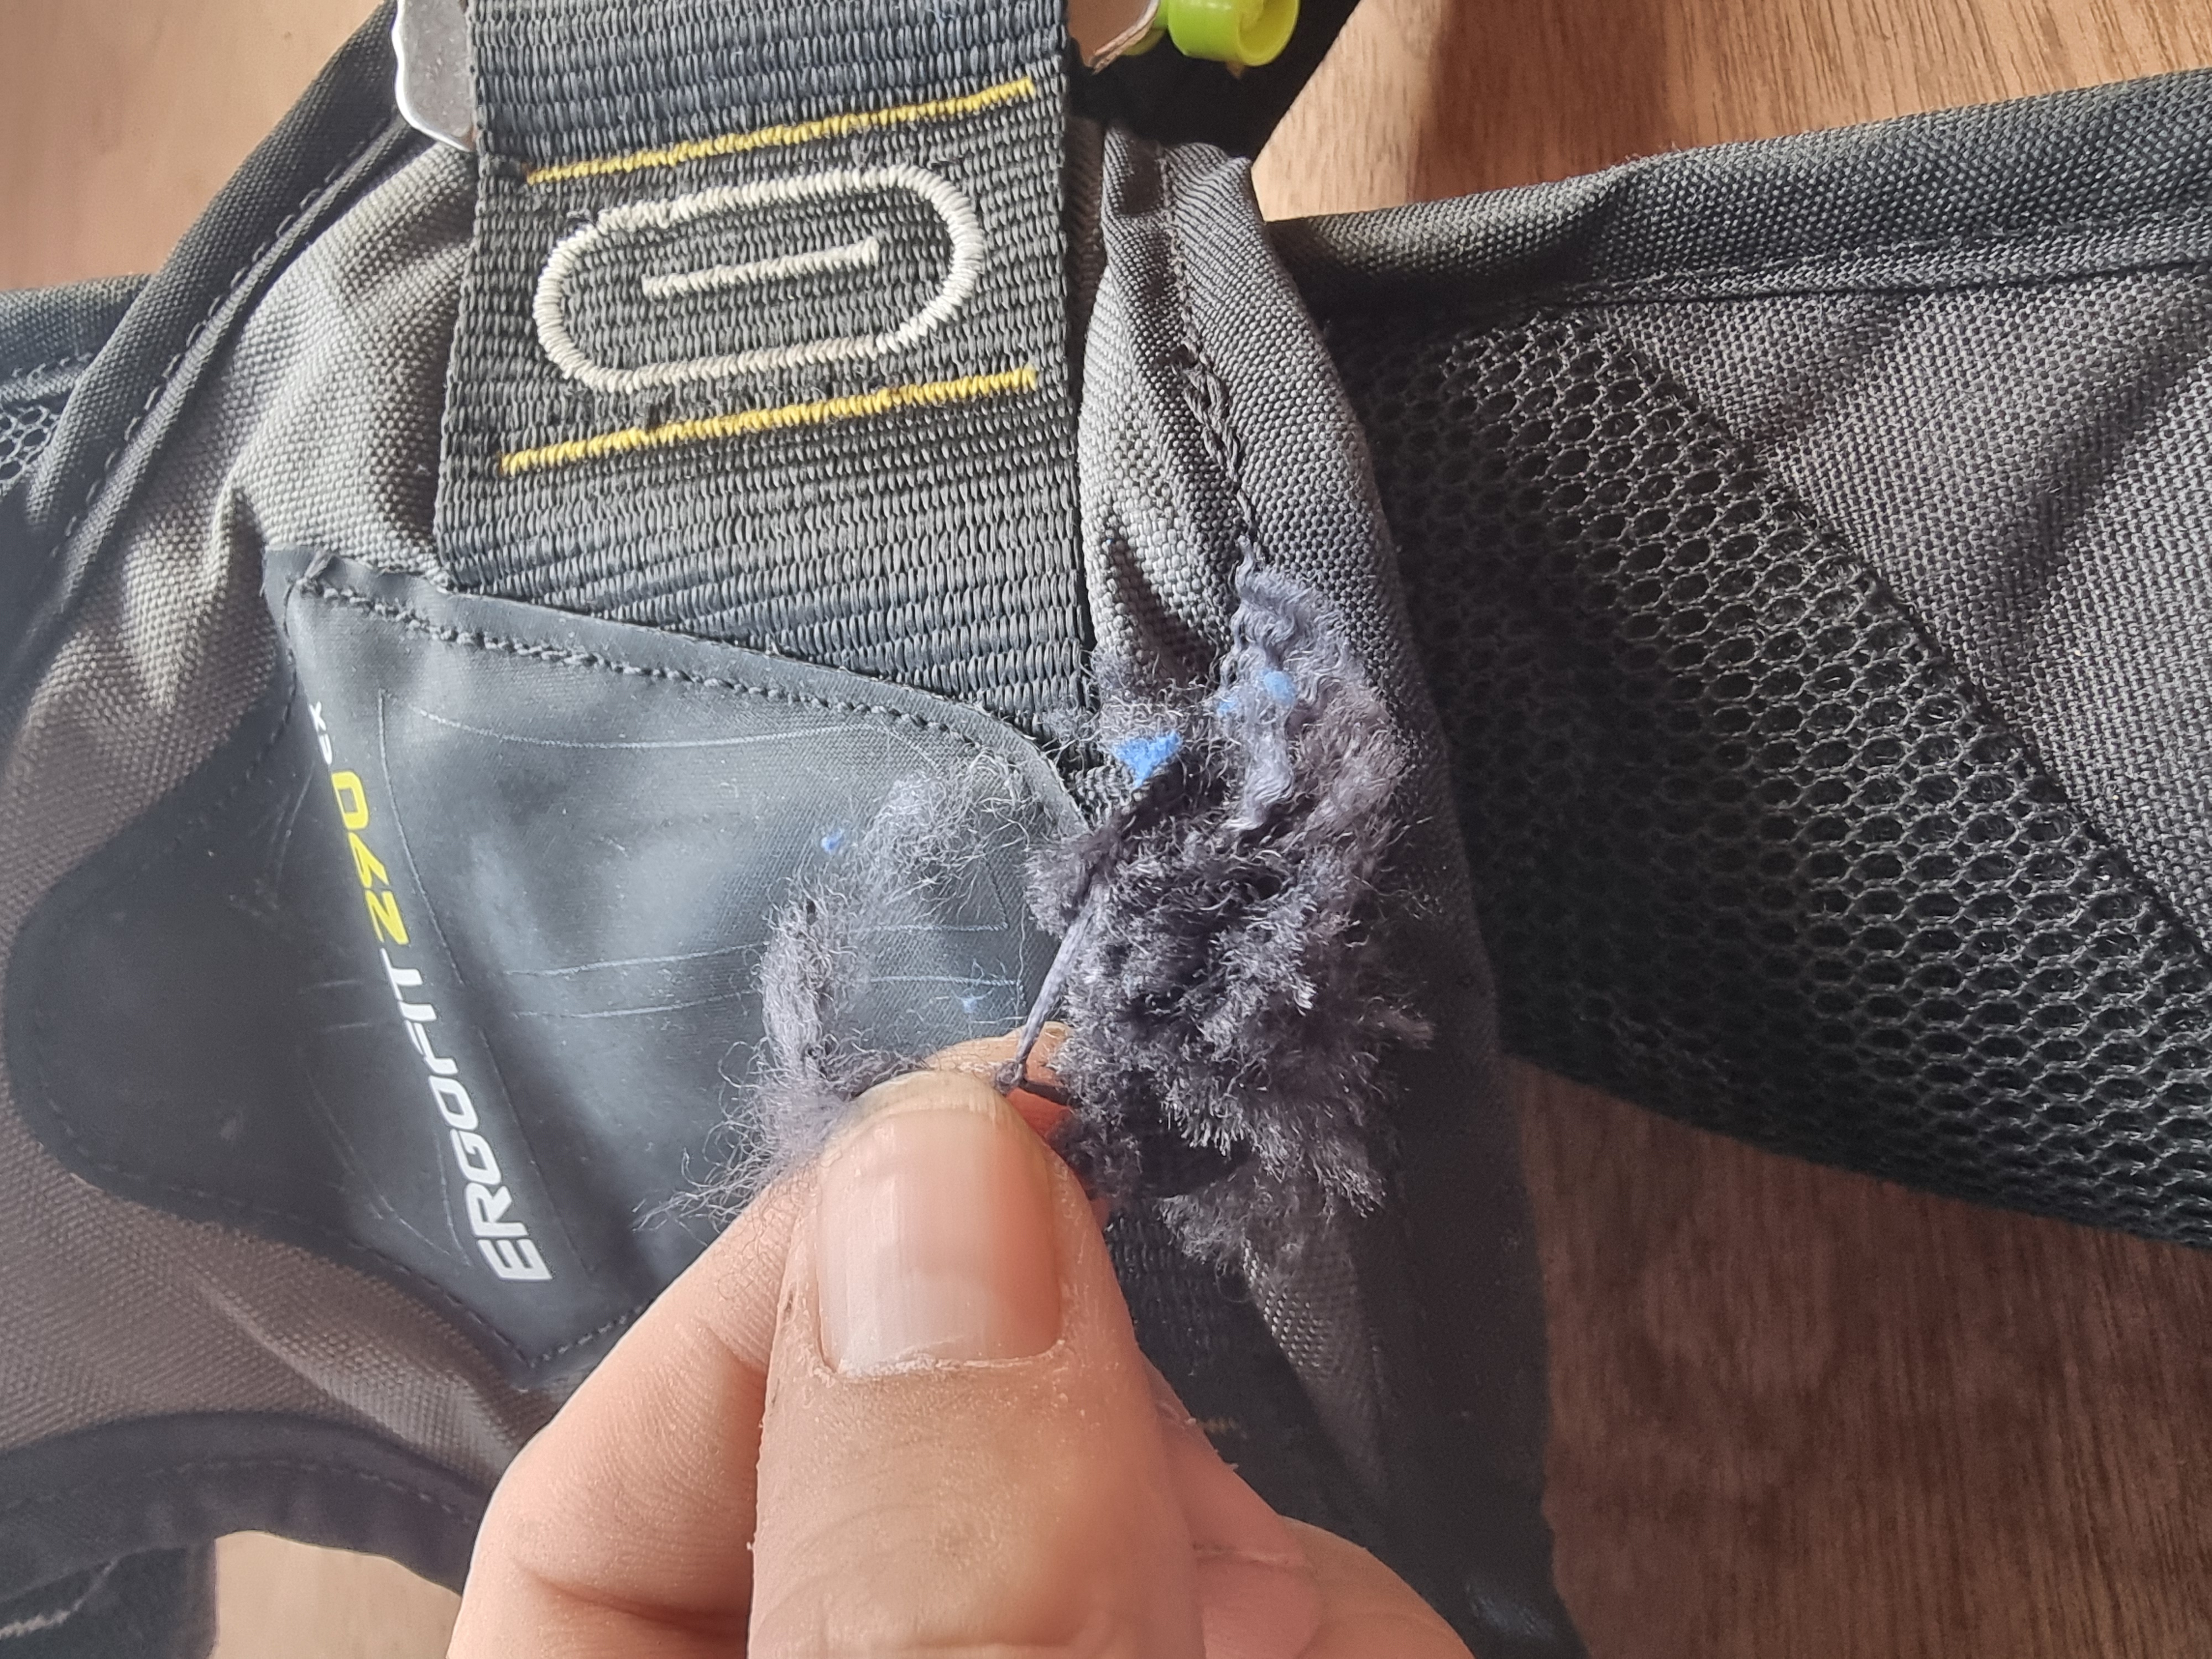
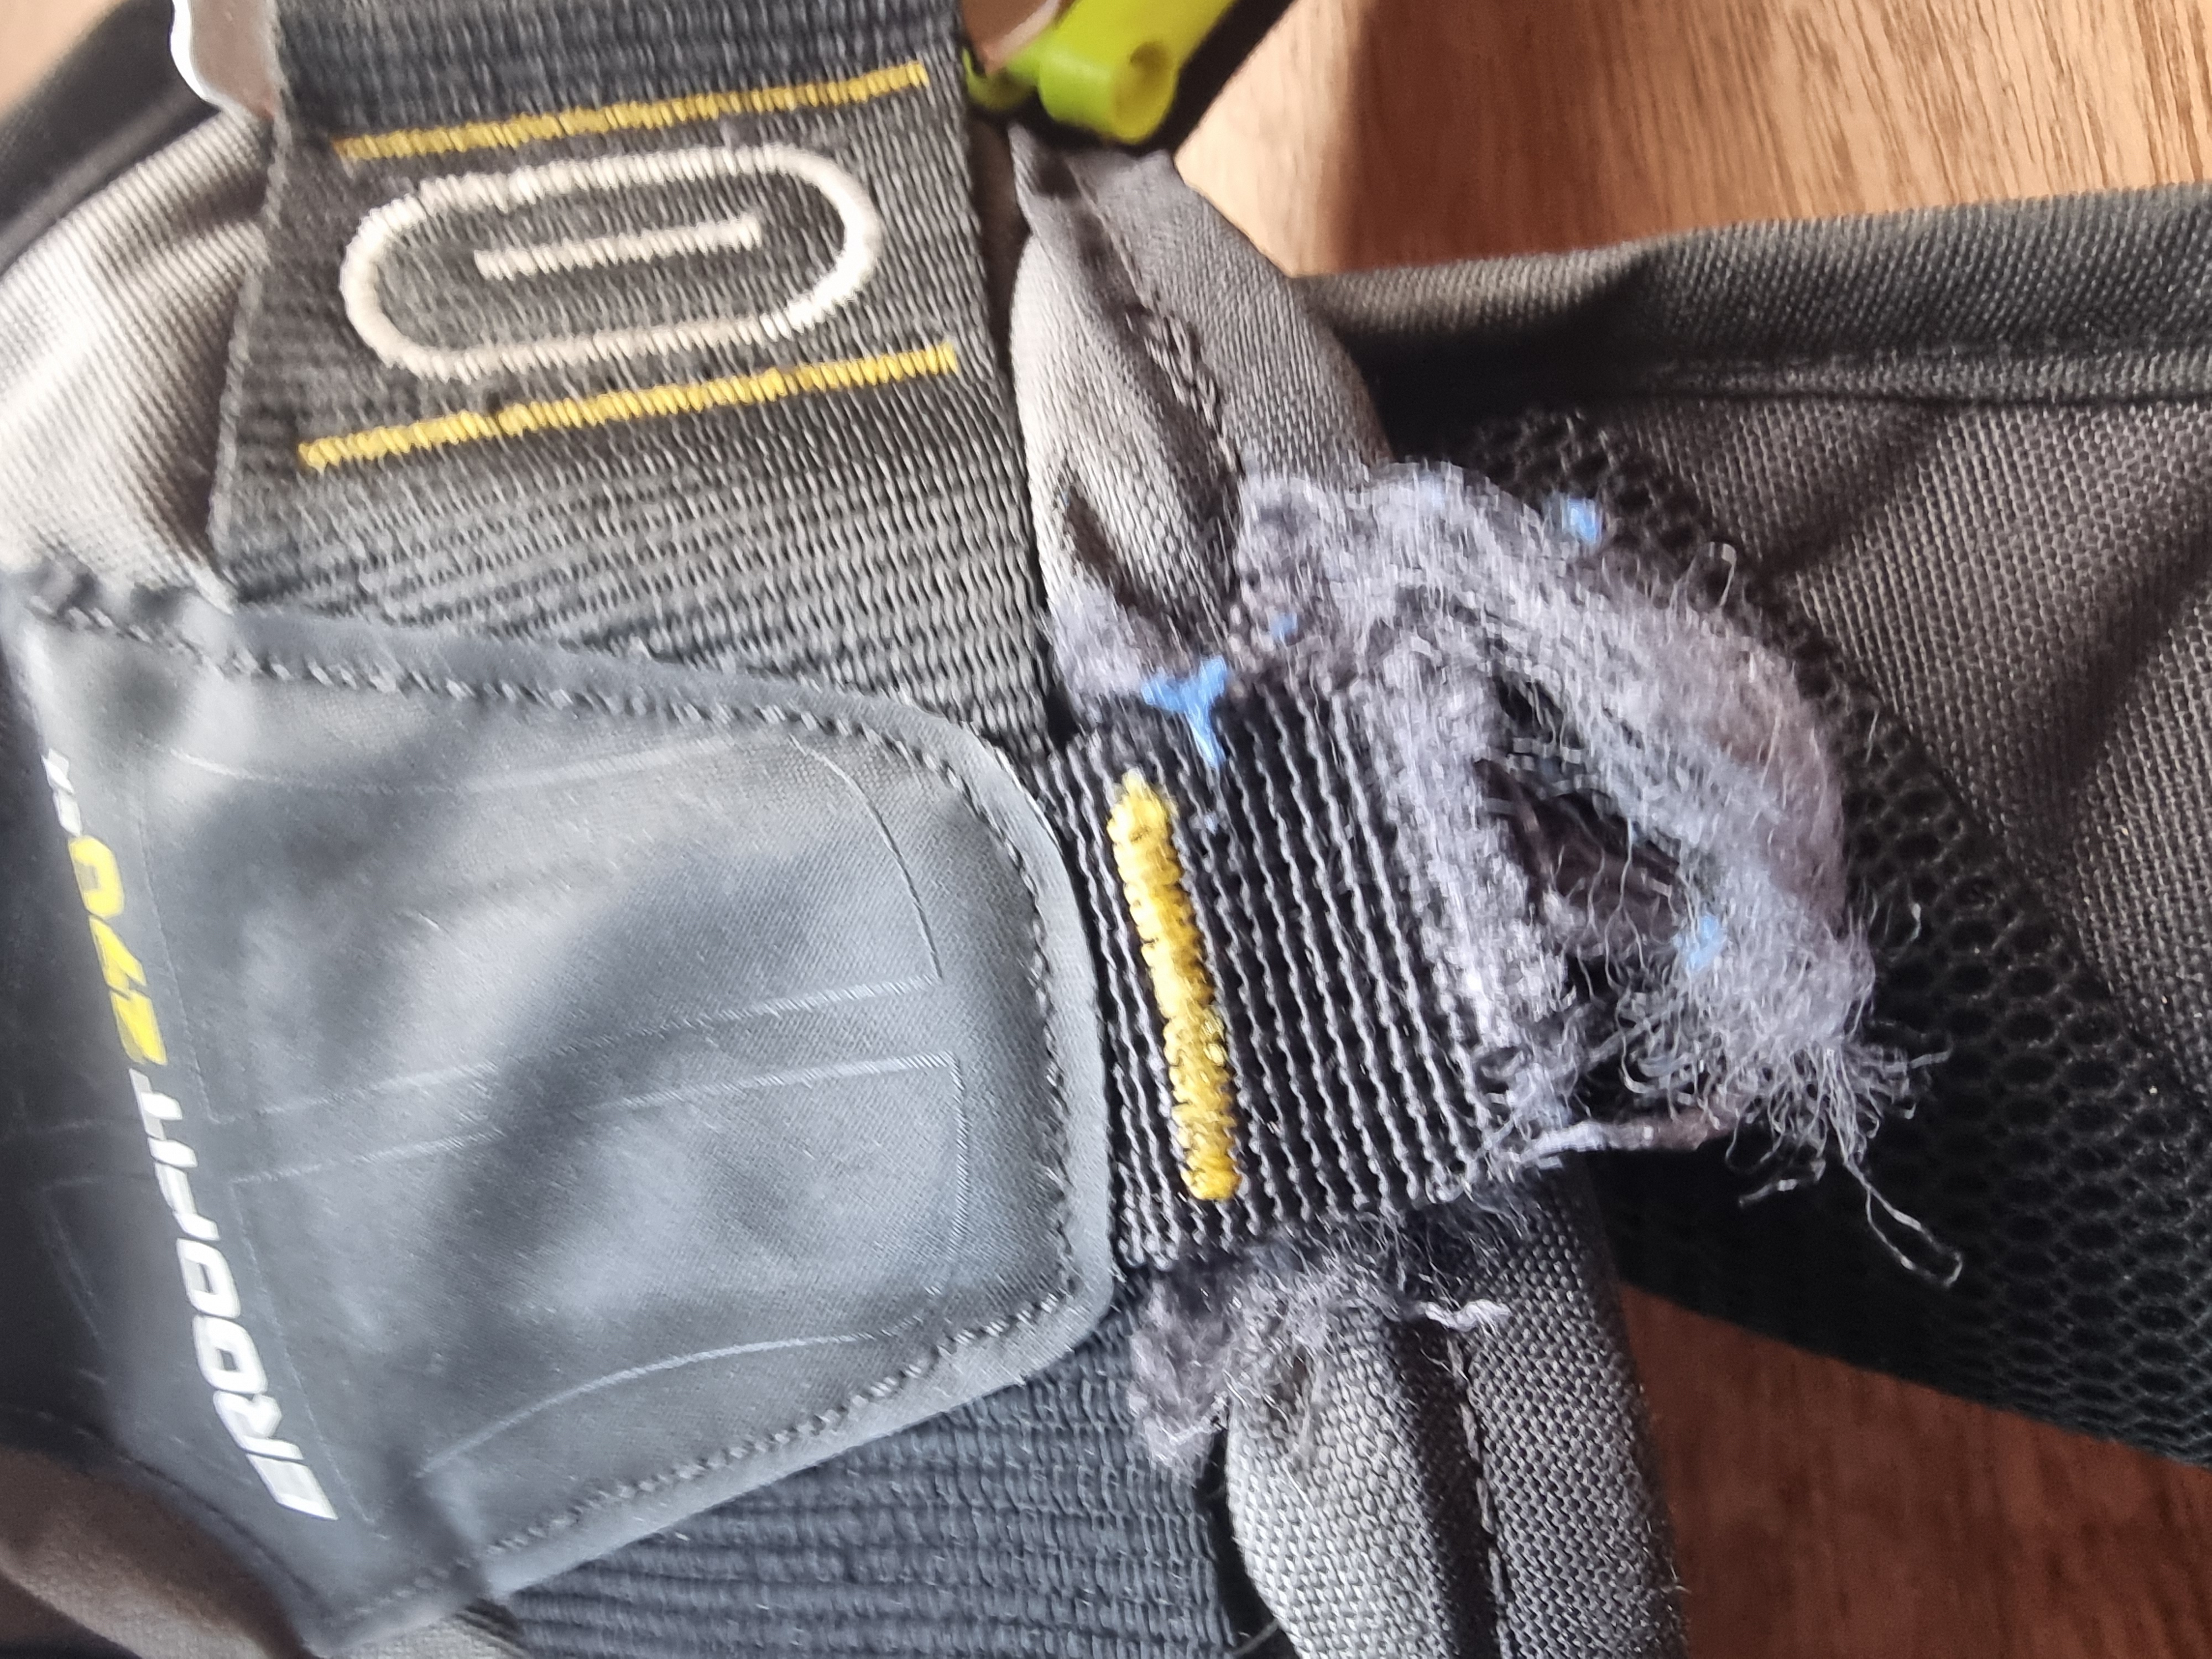
Cut material at the crotch-strap attachment
This actual ErgoFit 290 example shows a cut/altered crotch-strap attachment, not normal wear or fraying. When checking a lifejacket, look for cuts, alterations and damage at strap anchorages and distinguish these from ordinary surface wear. Any alteration needs assessment against the manufacturer's instructions and the intended use; do not assume that a modified attachment is acceptable.
LOOK
Cuts or intentionally altered attachment points, loose fibres around the cut area, weakened stitching and changes to how the straps connect to the jacket.
ACTION
Do not treat a cut or altered attachment as ordinary fraying. Refer any modification or uncertainty for a competent, manufacturer-informed assessment before use.
Authentic damaged lifejacket fabric
INSPECTION SECTION 05
Waist buckles, crotch-strap fastenings and fittings
Inspect the fastenings and attachment points that actually secure the lifejacket to the wearer. These may be plastic or metal depending on the design. Check waist-belt buckles, crotch-strap connections and any integrated harness fittings where fitted.
PLASTIC · Cracks and operation
Look for fractured clips, stress whitening, missing teeth, distortion and broken release tabs. Fasten and release the buckle as instructed; it should engage securely.
METAL · Rust and wear
Look for rust, pitting, corrosion, cracked welds, sharp edges, bent components, seized adjusters and damaged attachment points.
ATTACHMENTS · Security
Check that fitted D-rings, harness fittings and strap anchorages are secure and not pulling through their stitched or fabric attachments.
INSPECTION SECTION 06
CO₂ cylinder: correct, secure and undamaged
A CO₂ cylinder can become loose even when a lifejacket has not been intentionally discharged. Check the exact model's specified cylinder size, secure fitting and condition, and look for piercing, corrosion and staining of surrounding bladder material.
Correct cylinder
Verify the specified cylinder size and type, where accessible, and check for signs of a missing, pierced or previously discharged cylinder using the manufacturer's instructions.
Secure installation
Where the manufacturer permits a user check, confirm the cylinder is correctly seated and screwed in to the specified tightness. Do not overtighten or use improvised tools.
Cylinder condition
Look for corrosion, pitting, dents, damaged threads and rough areas that could abrade the bladder.
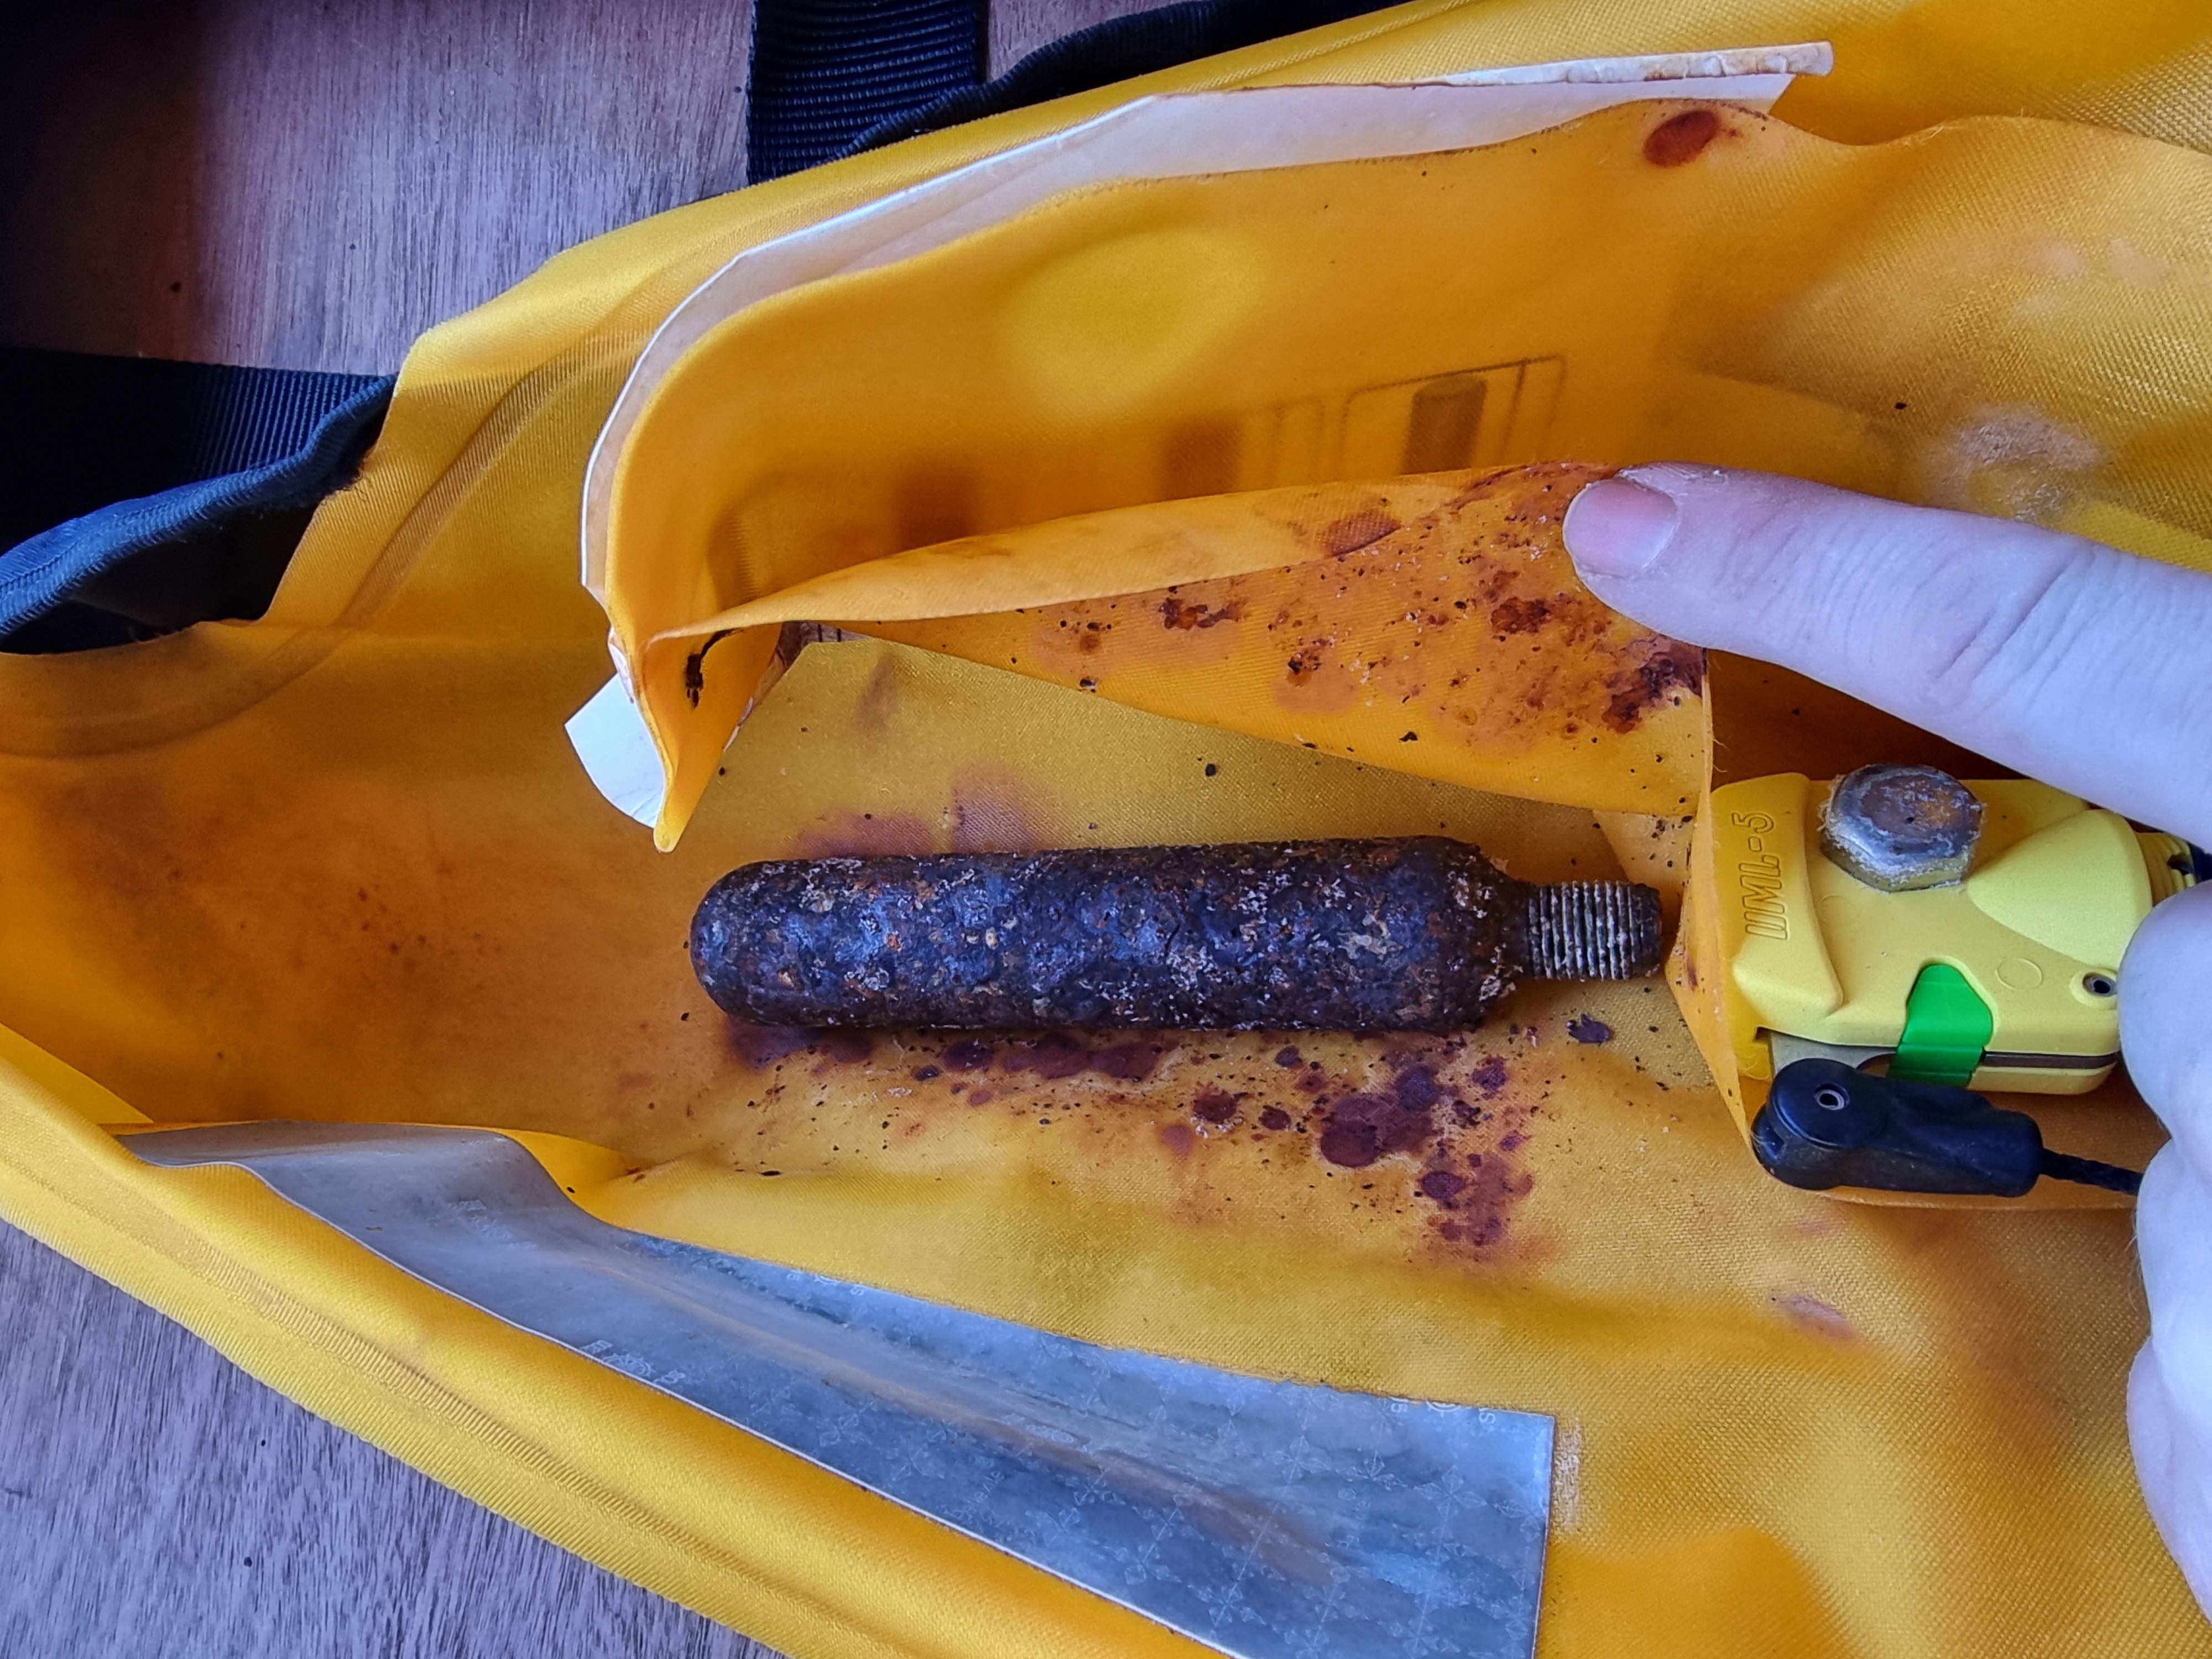
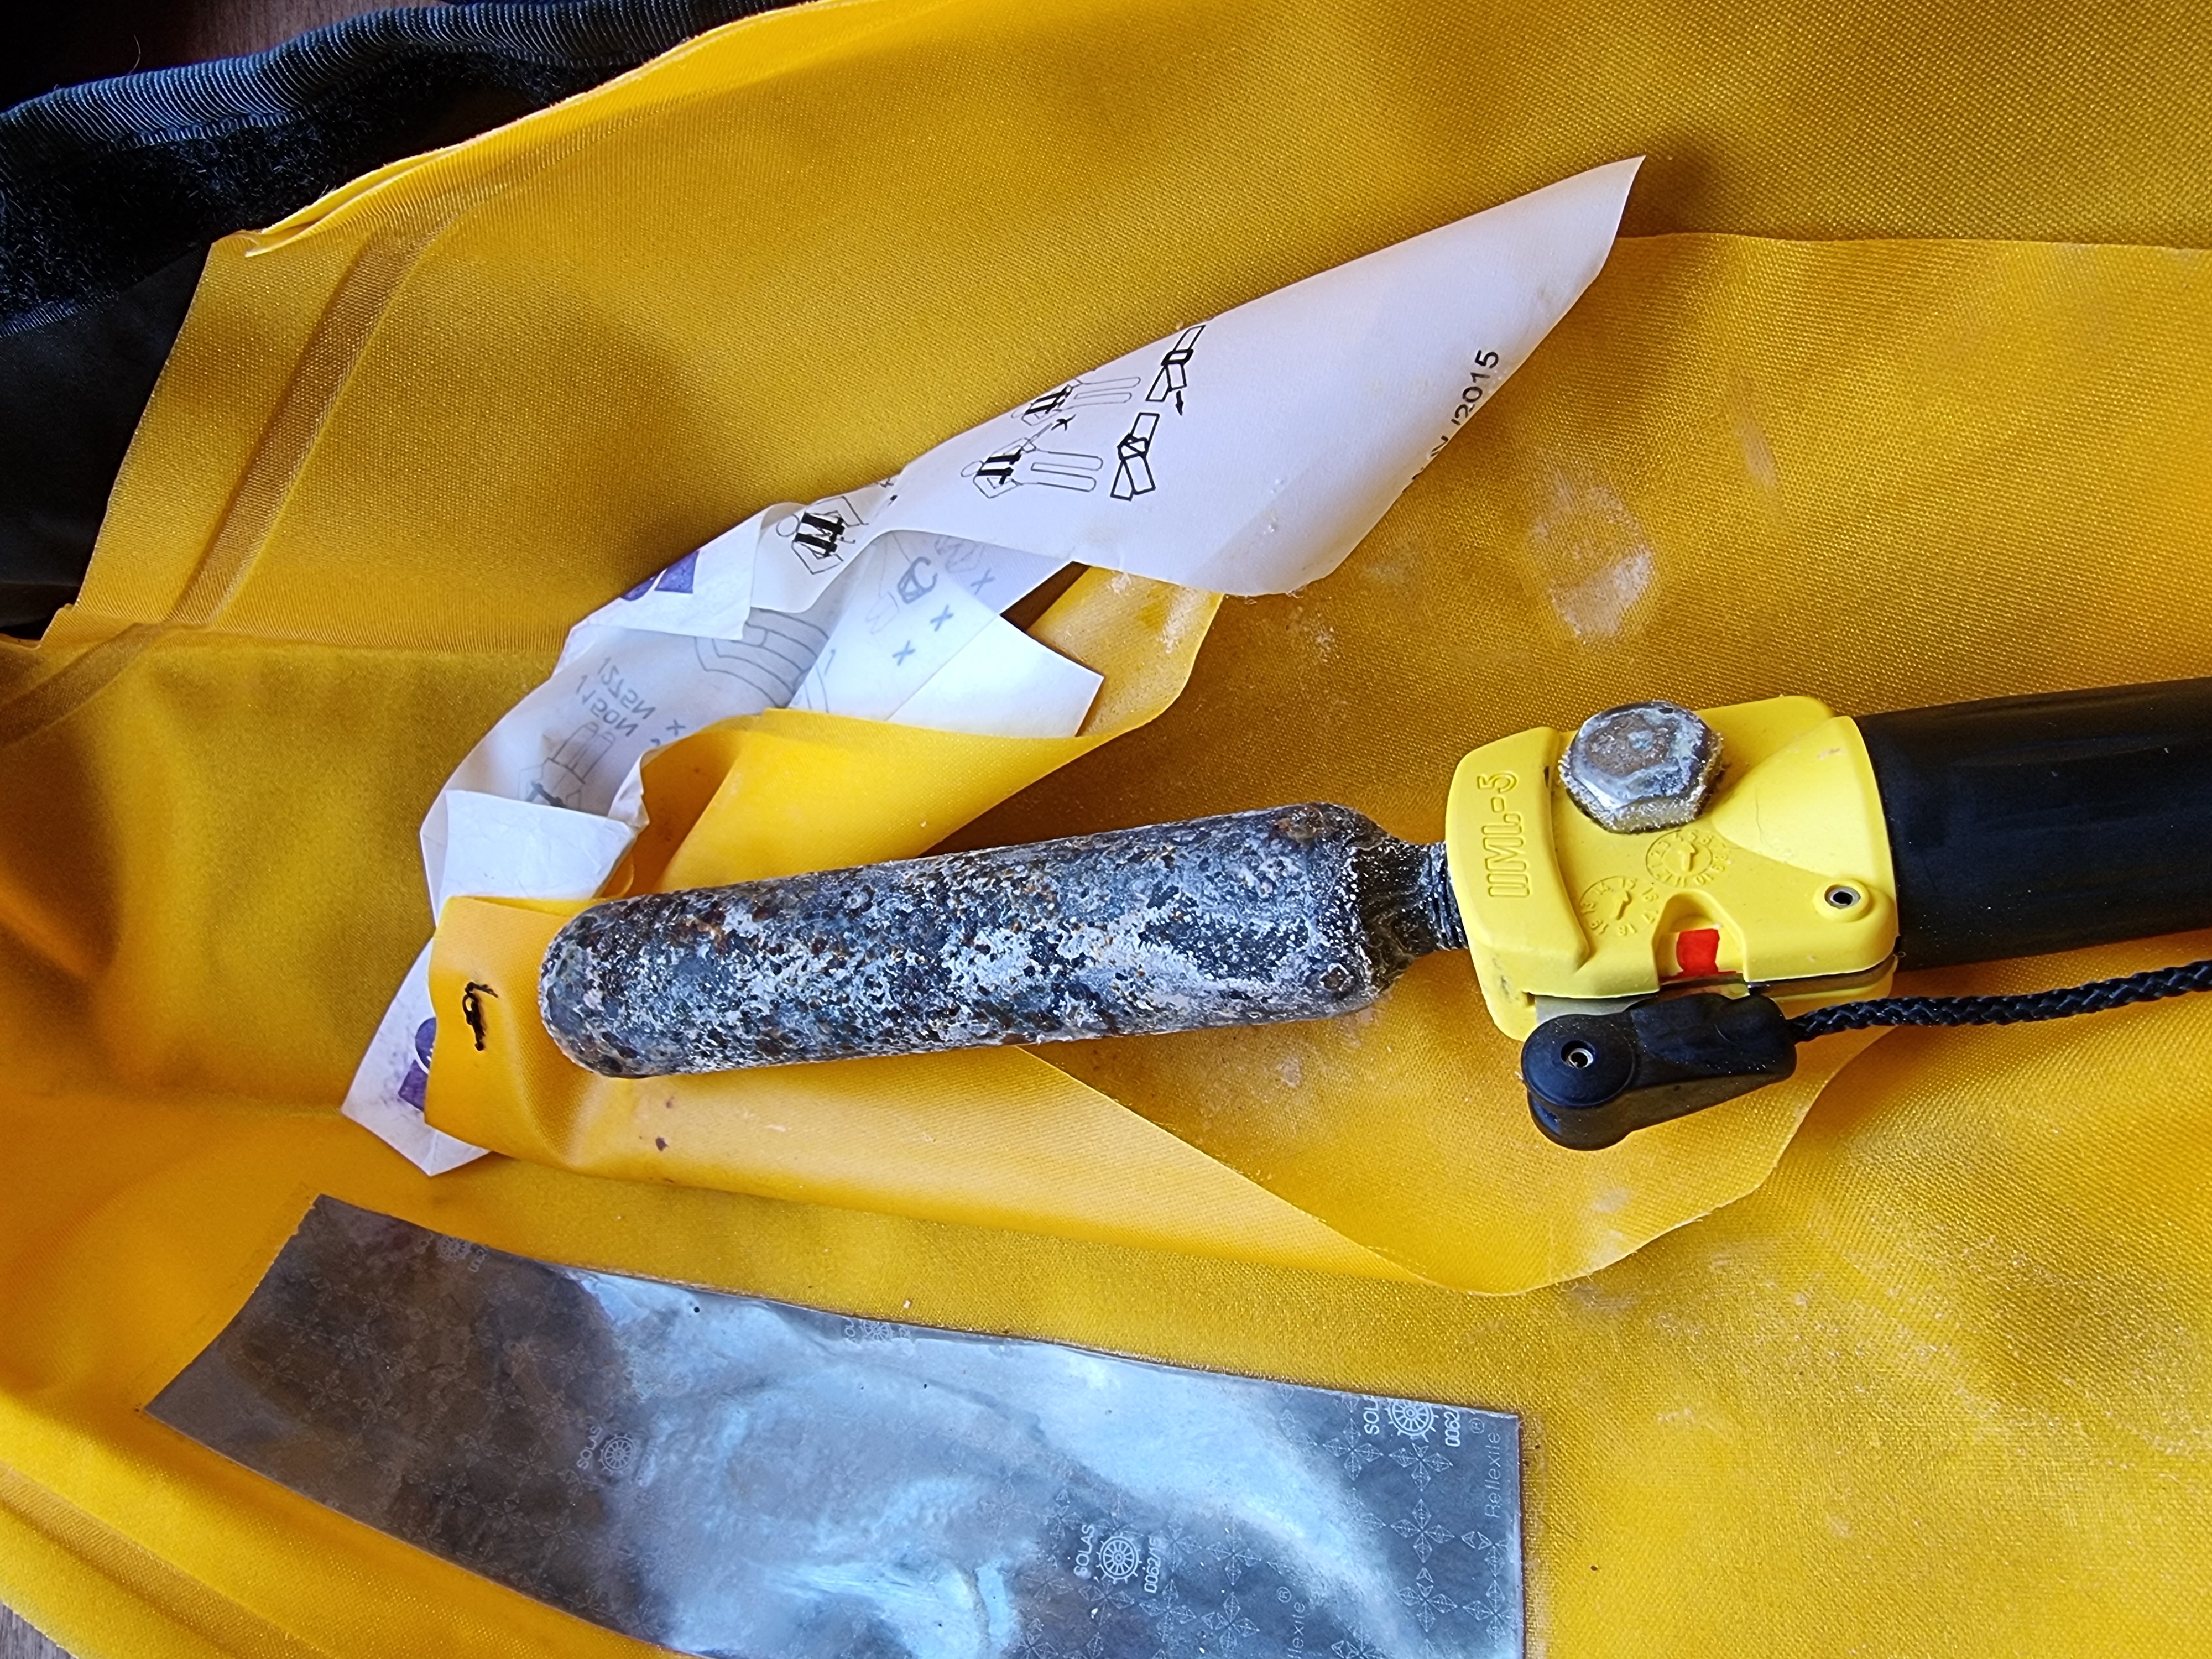
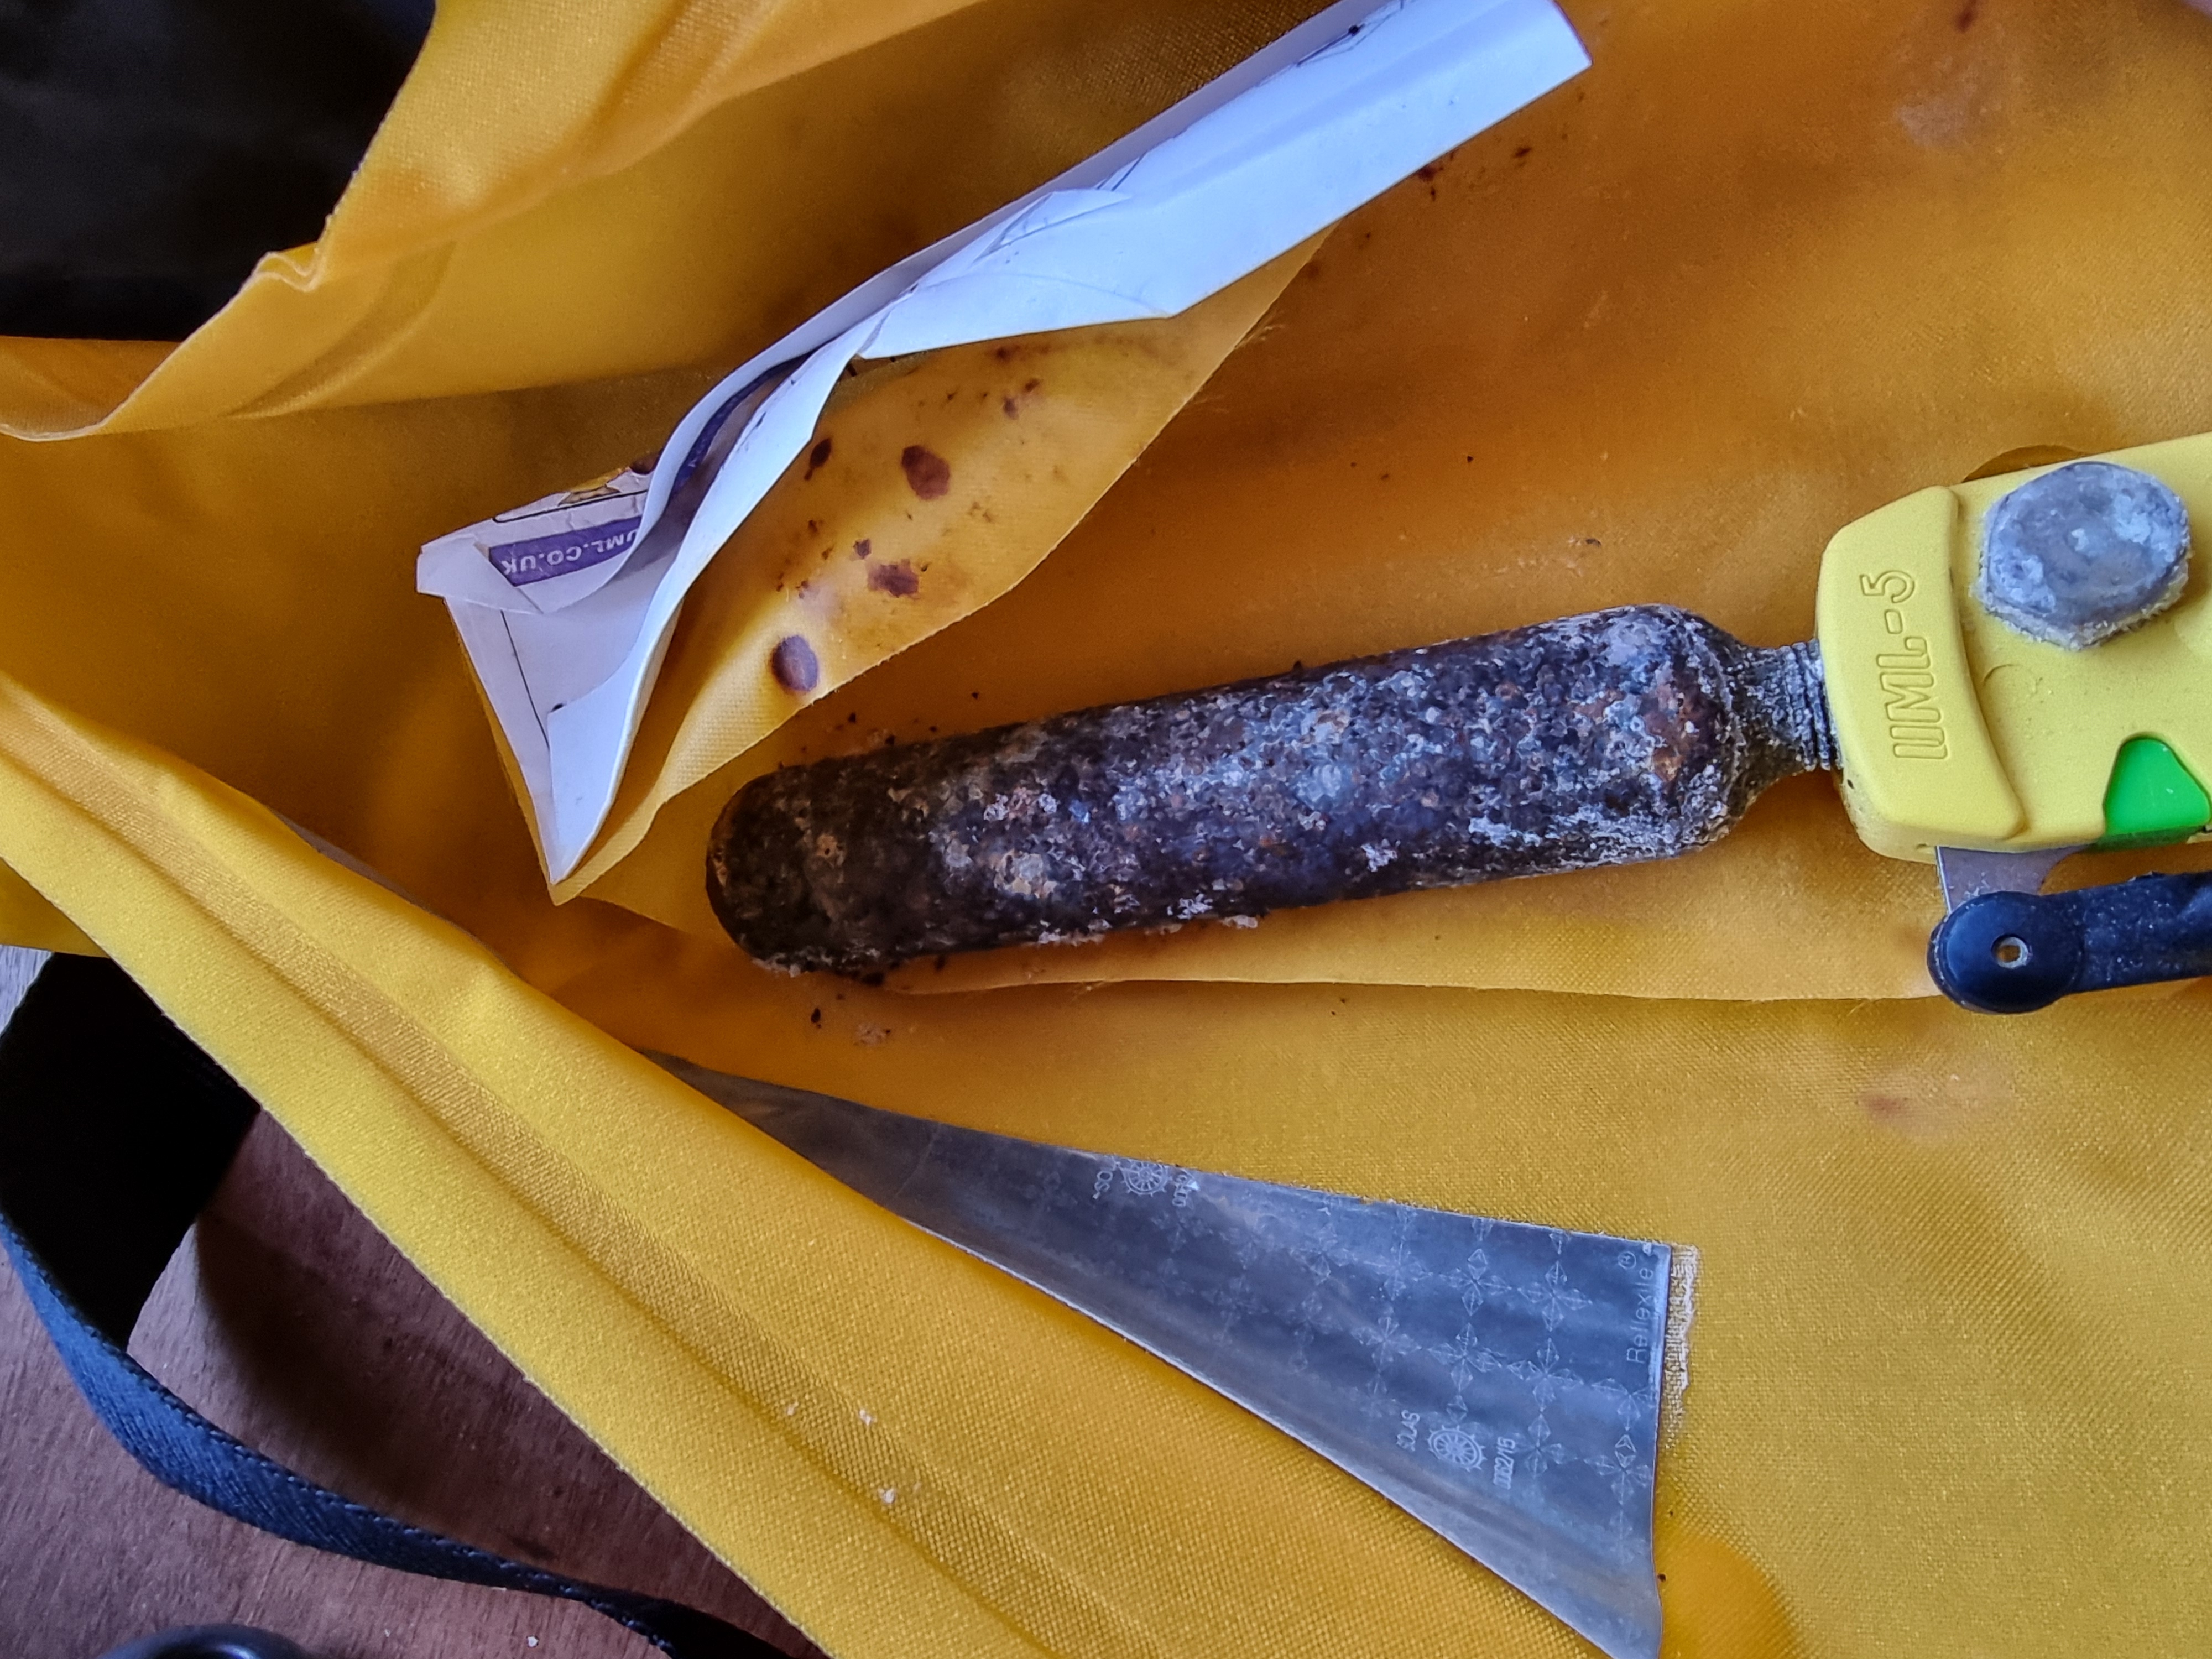
Severely corroded, loose and detached CO₂ cylinders
These are genuine examples from lifejackets examined by RISE Safety. The CO₂ cylinders showed extensive rust and pitting. Some were found loose or completely detached from the inflator without being deliberately unscrewed for the photographs. Rust-coloured deposits were also found on the surrounding yellow bladder material.
What to look for
Rust, pitting, encrustation, loose or separated cylinders, damaged threads and staining or contamination of adjacent bladder fabric.
Why it matters
A loose or detached cylinder may prevent the bladder inflating when needed. Extensive corrosion also requires assessment of the cylinder, assembly and contacted fabric.
Important distinction: The photographs show corrosion and loosening found together; the photographs alone do not establish exactly what caused the cylinders to loosen.
Corrosion found during real inspections
INSPECTION SECTION 07
Automatic firing mechanism, cap and retaining clips
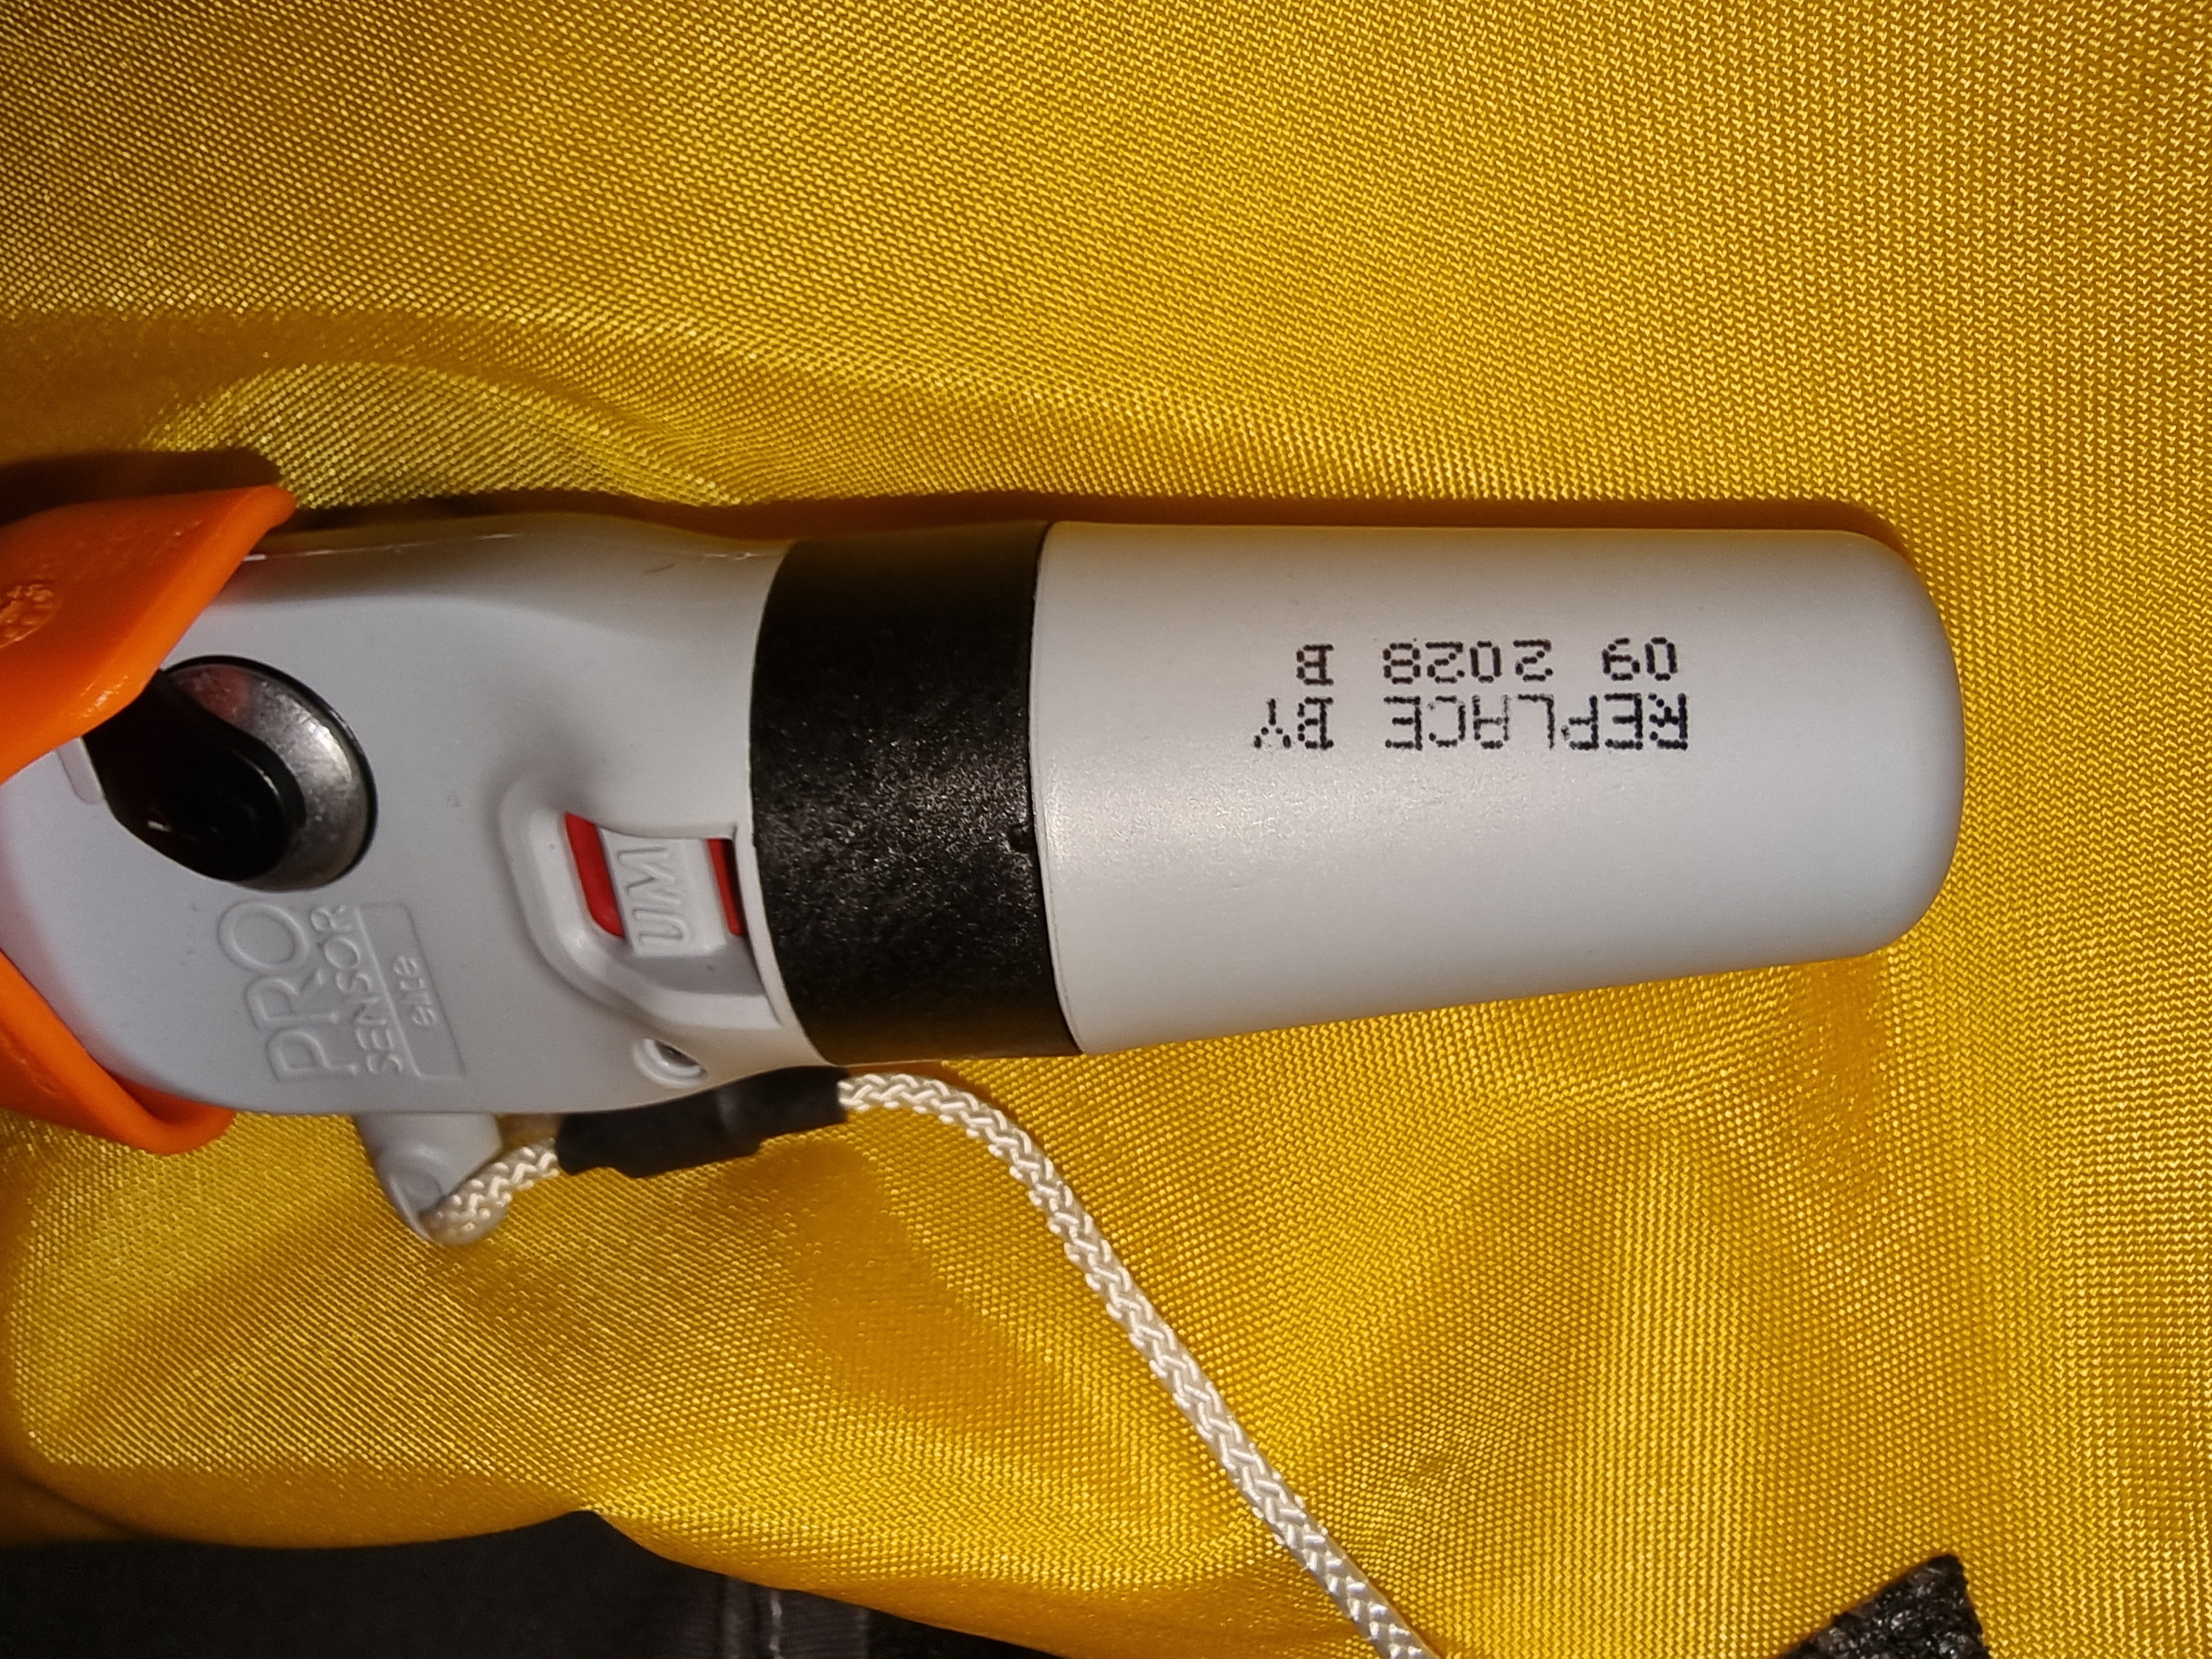
The Pro Sensor Elite and UML-5 systems shown in this guide use different indicator and retaining arrangements. Check the exact make and model; both the automatic component and CO₂ cylinder must be correctly fitted, in date where applicable, and in the proper ready condition.
Automatic cap or cartridge
Where fitted, confirm the correct cap or cartridge is in date, properly seated and secured as instructed. Do not assume every system uses the same type.
Armed-state indicators
Check manufacturer-specific green/red indicators or windows. A green indicator alone does not establish overall serviceability.
Retention tab or clip
Where specified, confirm that the retaining clip, security tab or pin is present, intact and correctly located. Some mechanisms have a different arrangement.
Manual pull toggle
Check that the manual inflation handle is present, undamaged and accessible outside the cover. Do not pull it during a routine pre-use check.
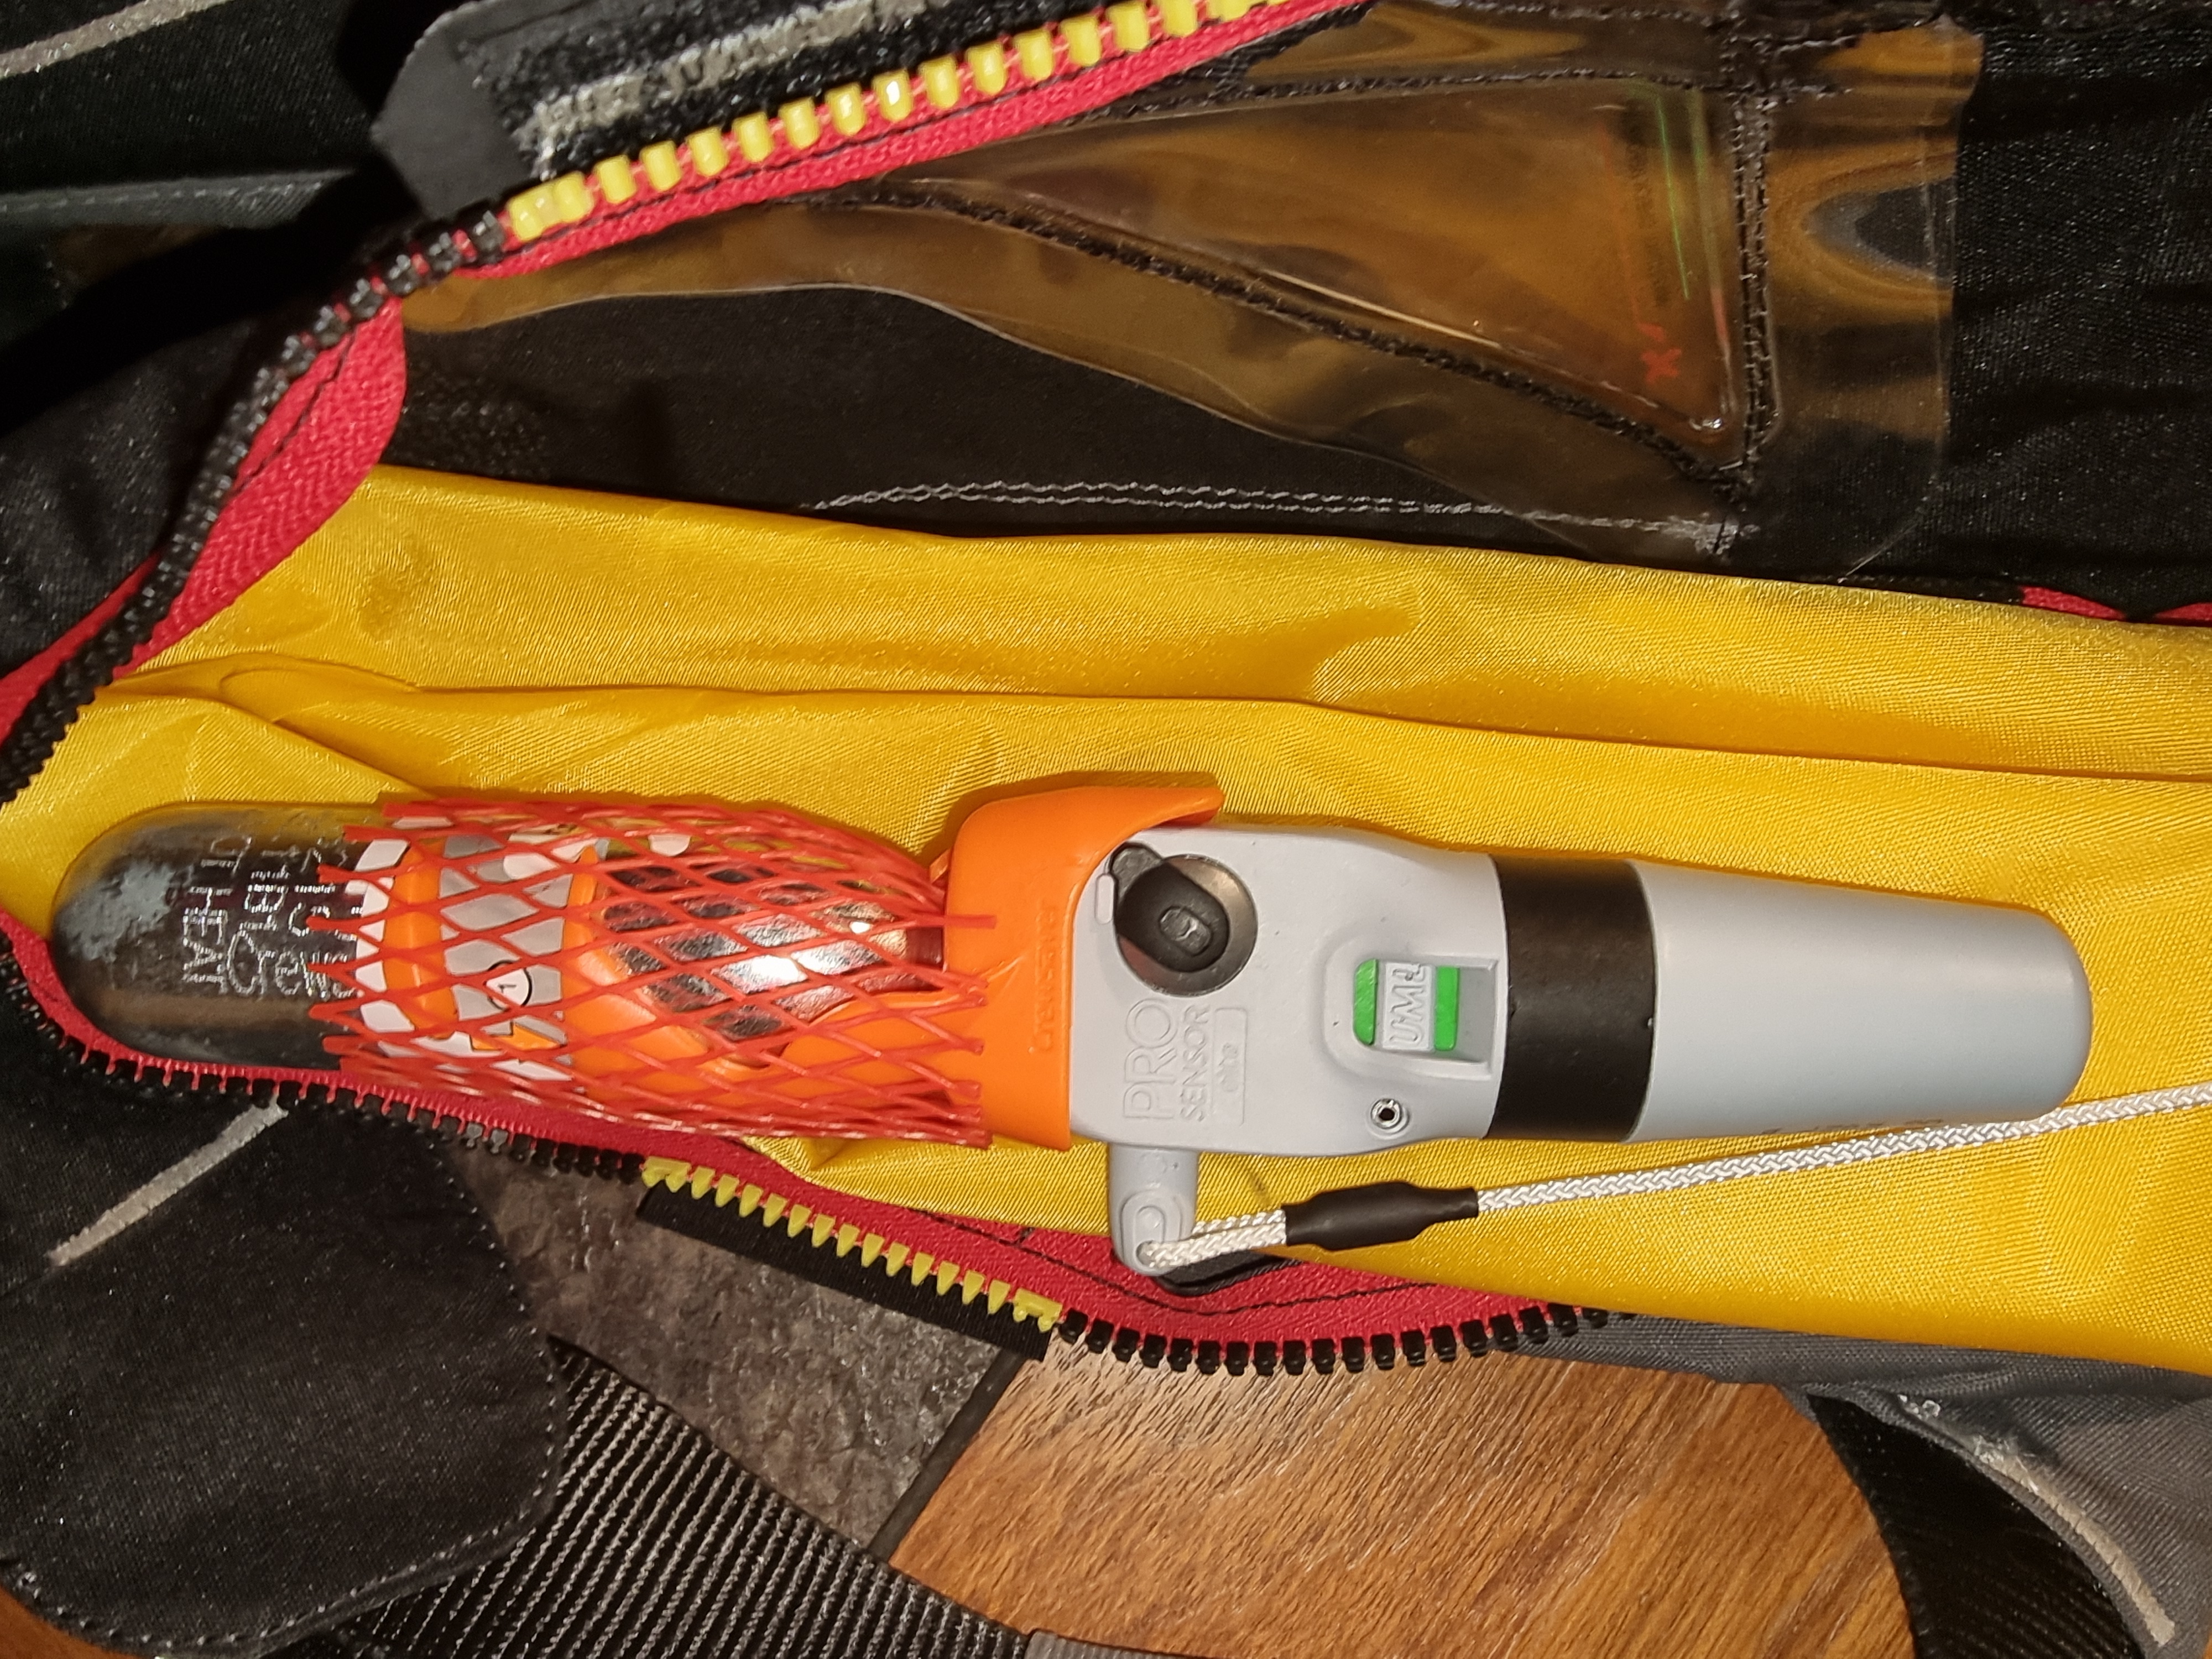
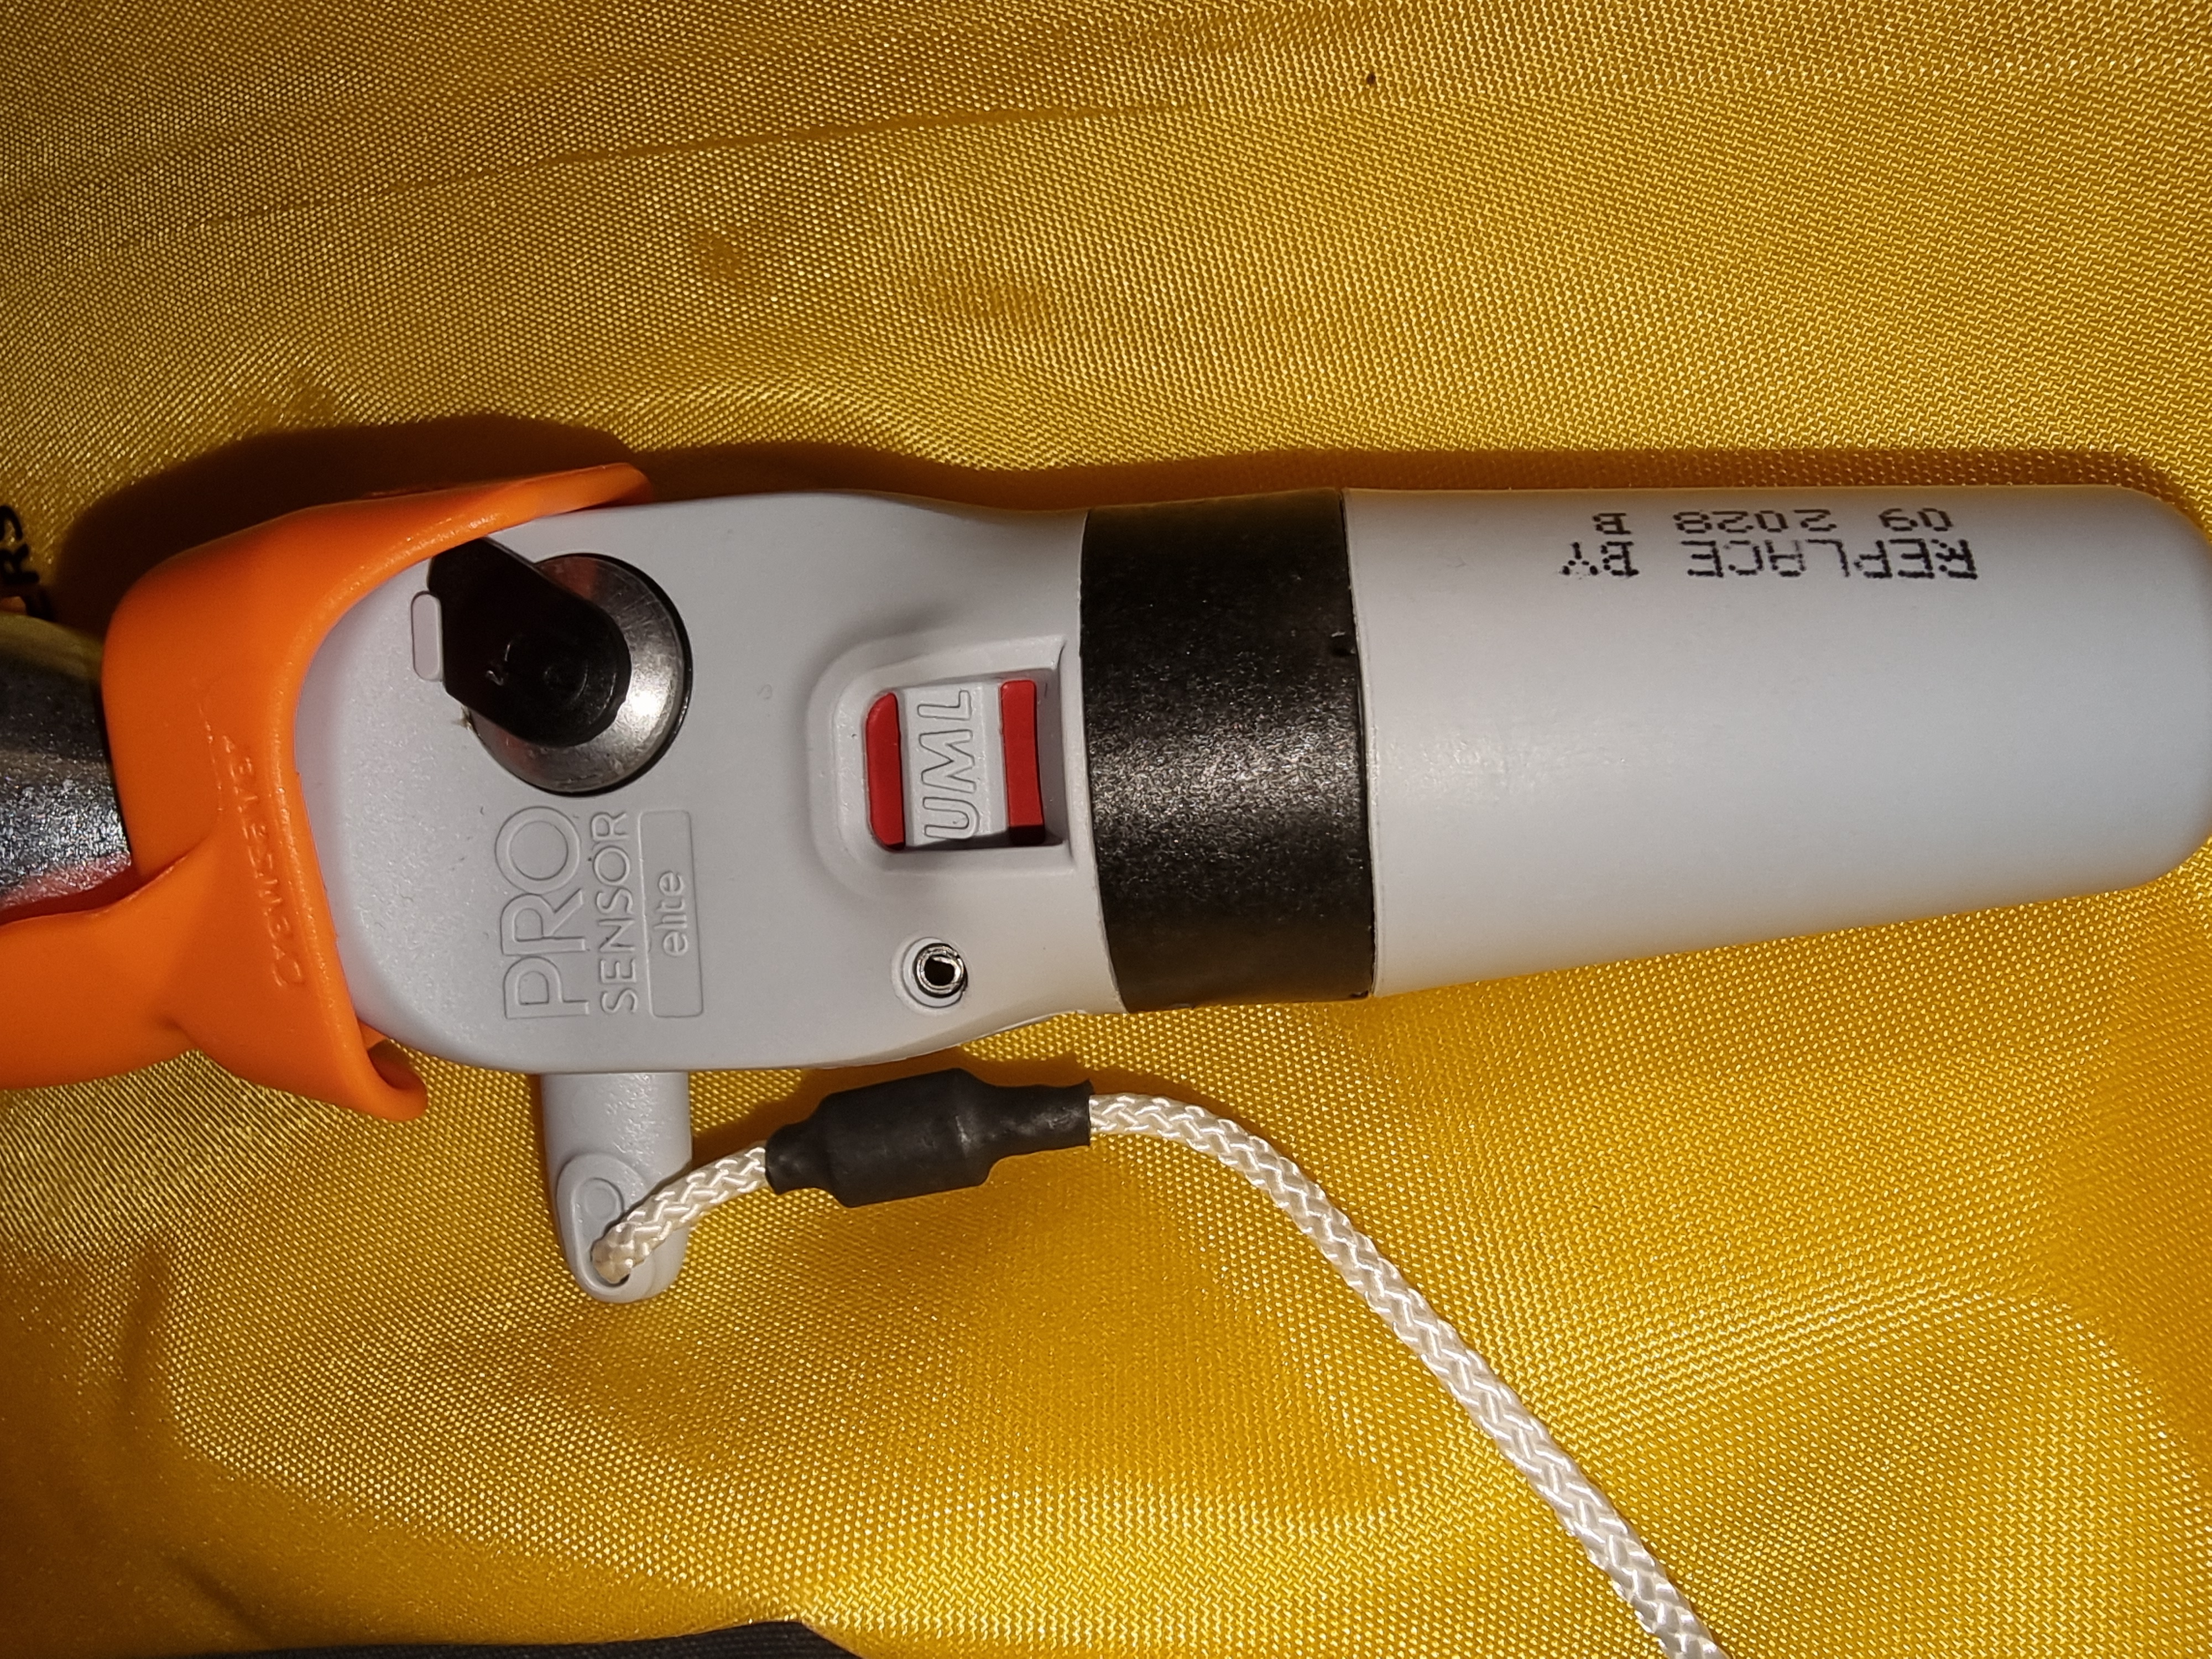
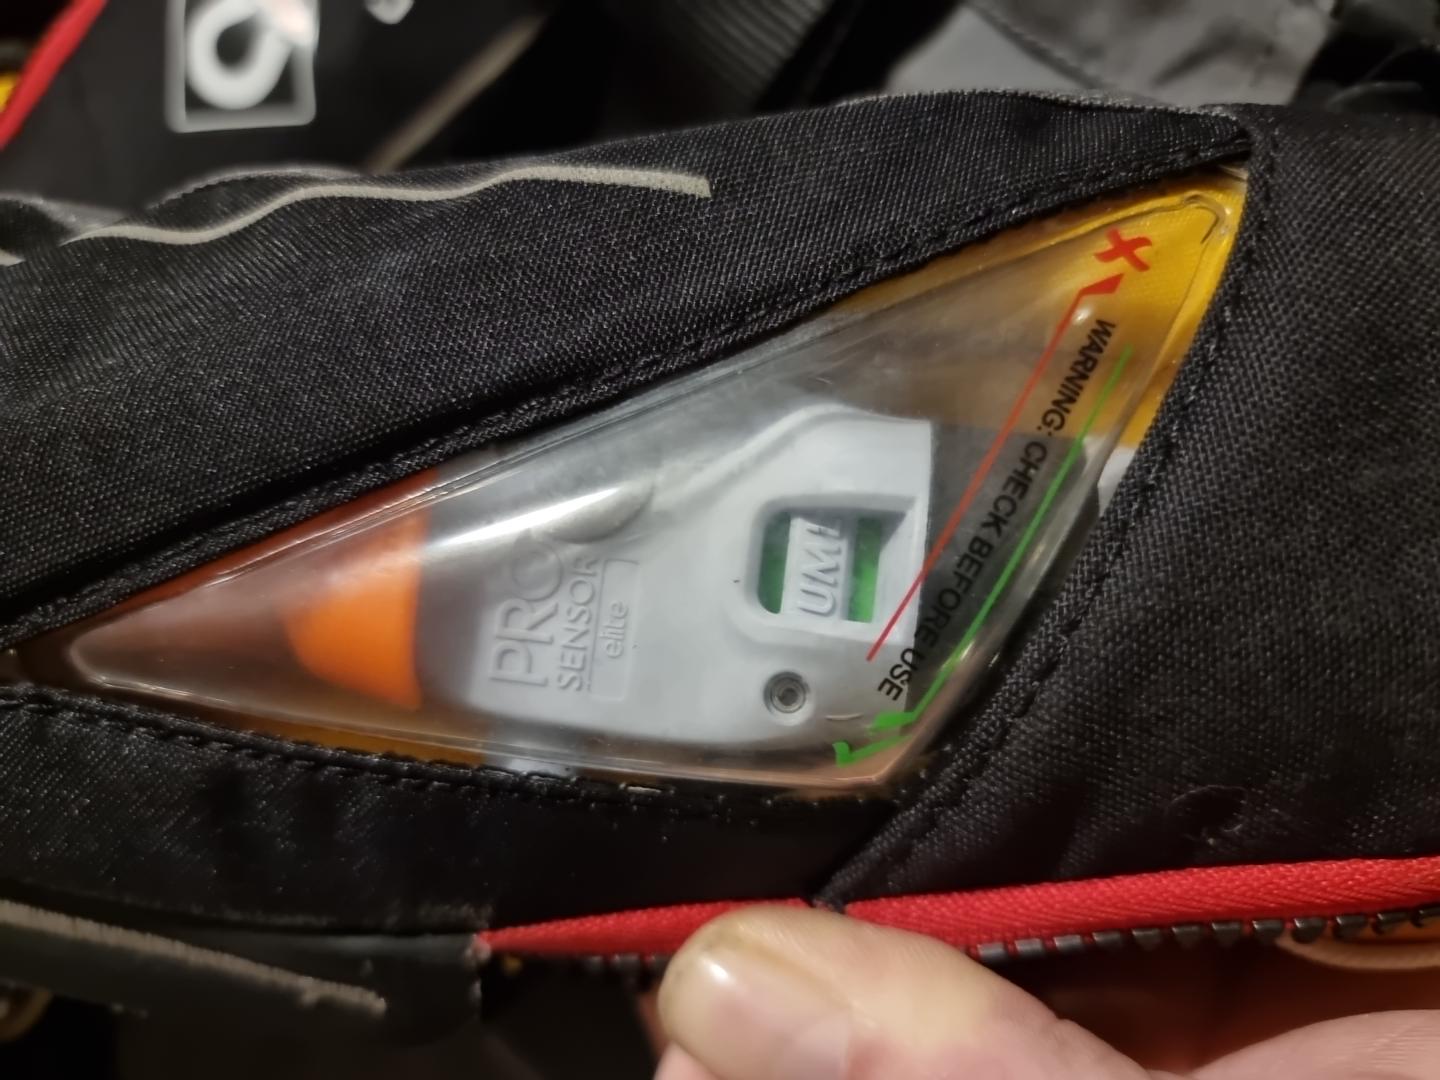
Pro Sensor Elite: two separate status indicators
The photographed Pro Sensor Elite system has two indicators: the upper one relates to the CO₂ cylinder and the lower one to the automatic activation capsule. Both must show the correct green condition for that specific system. An indicator showing red, missing or partly red means stop and investigate; it can indicate a fired, missing or incorrectly fitted component, depending on the mechanism.
Upper indicator · CO₂ cylinder
Green: correct cylinder indication. Red or partly red: the cylinder may have fired, be absent or not be fitted correctly. Do not rely on this indicator alone to check for damage or corrosion.
Lower indicator · Automatic capsule
Green: correct automatic-component indication. Red: the automatic capsule may have activated or is not correctly in place. Also check the replacement date and correct installation.
View it through the cover
On the photographed lifejacket the indicator is visible through the clear inspection window; a user can inspect it without opening the cover. The clear window must be readable and unobstructed.
Tamper-evident retaining sticker
Where this Crewsaver retaining/seal arrangement is fitted, inspect it for damage or evidence of interference. A broken or missing seal requires checking the system according to the manufacturer's instructions; an intact seal is not proof of overall serviceability.
Photo-specific detail: The original RISE Safety photograph of this Pro Sensor Elite assembly shows a 33 g CO₂ cylinder. Never assume a cylinder size from another lifejacket; use the exact capacity specified for the make and model.
Manufacturer information: UML — how automatic inflation systems work.
Pro Sensor Elite status and external check
UML-5: retaining clip and green/red firing indicators
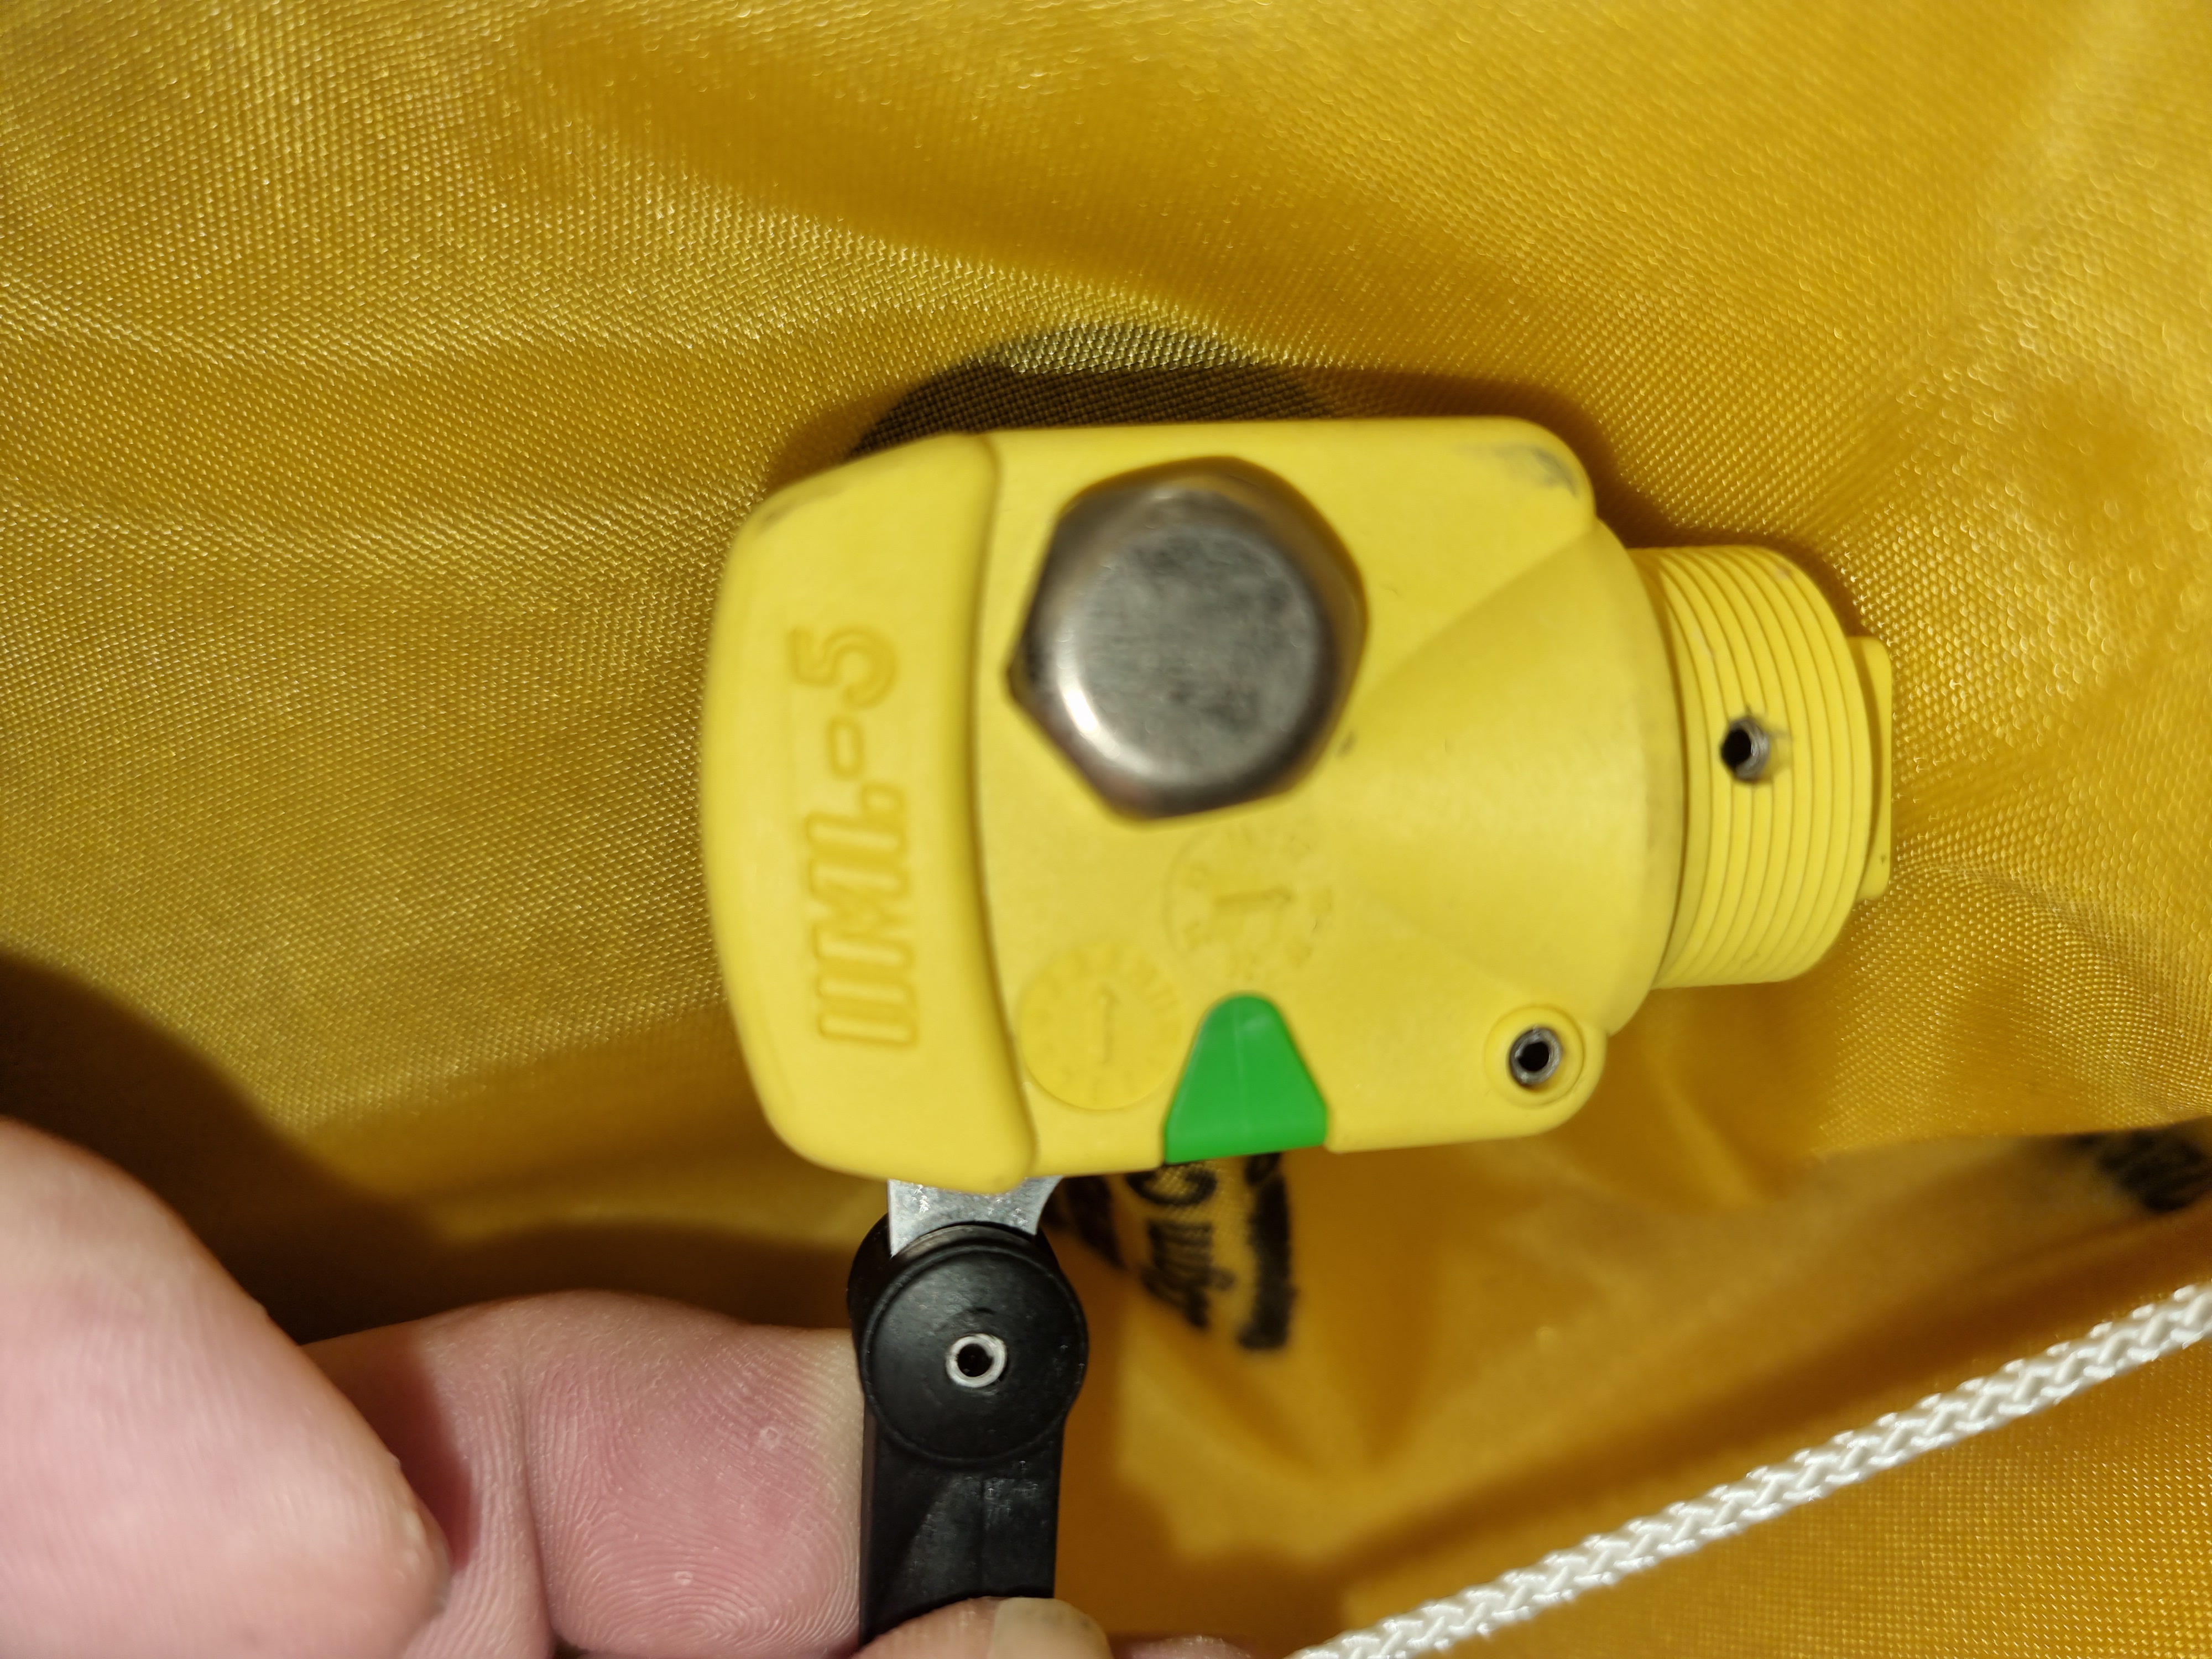
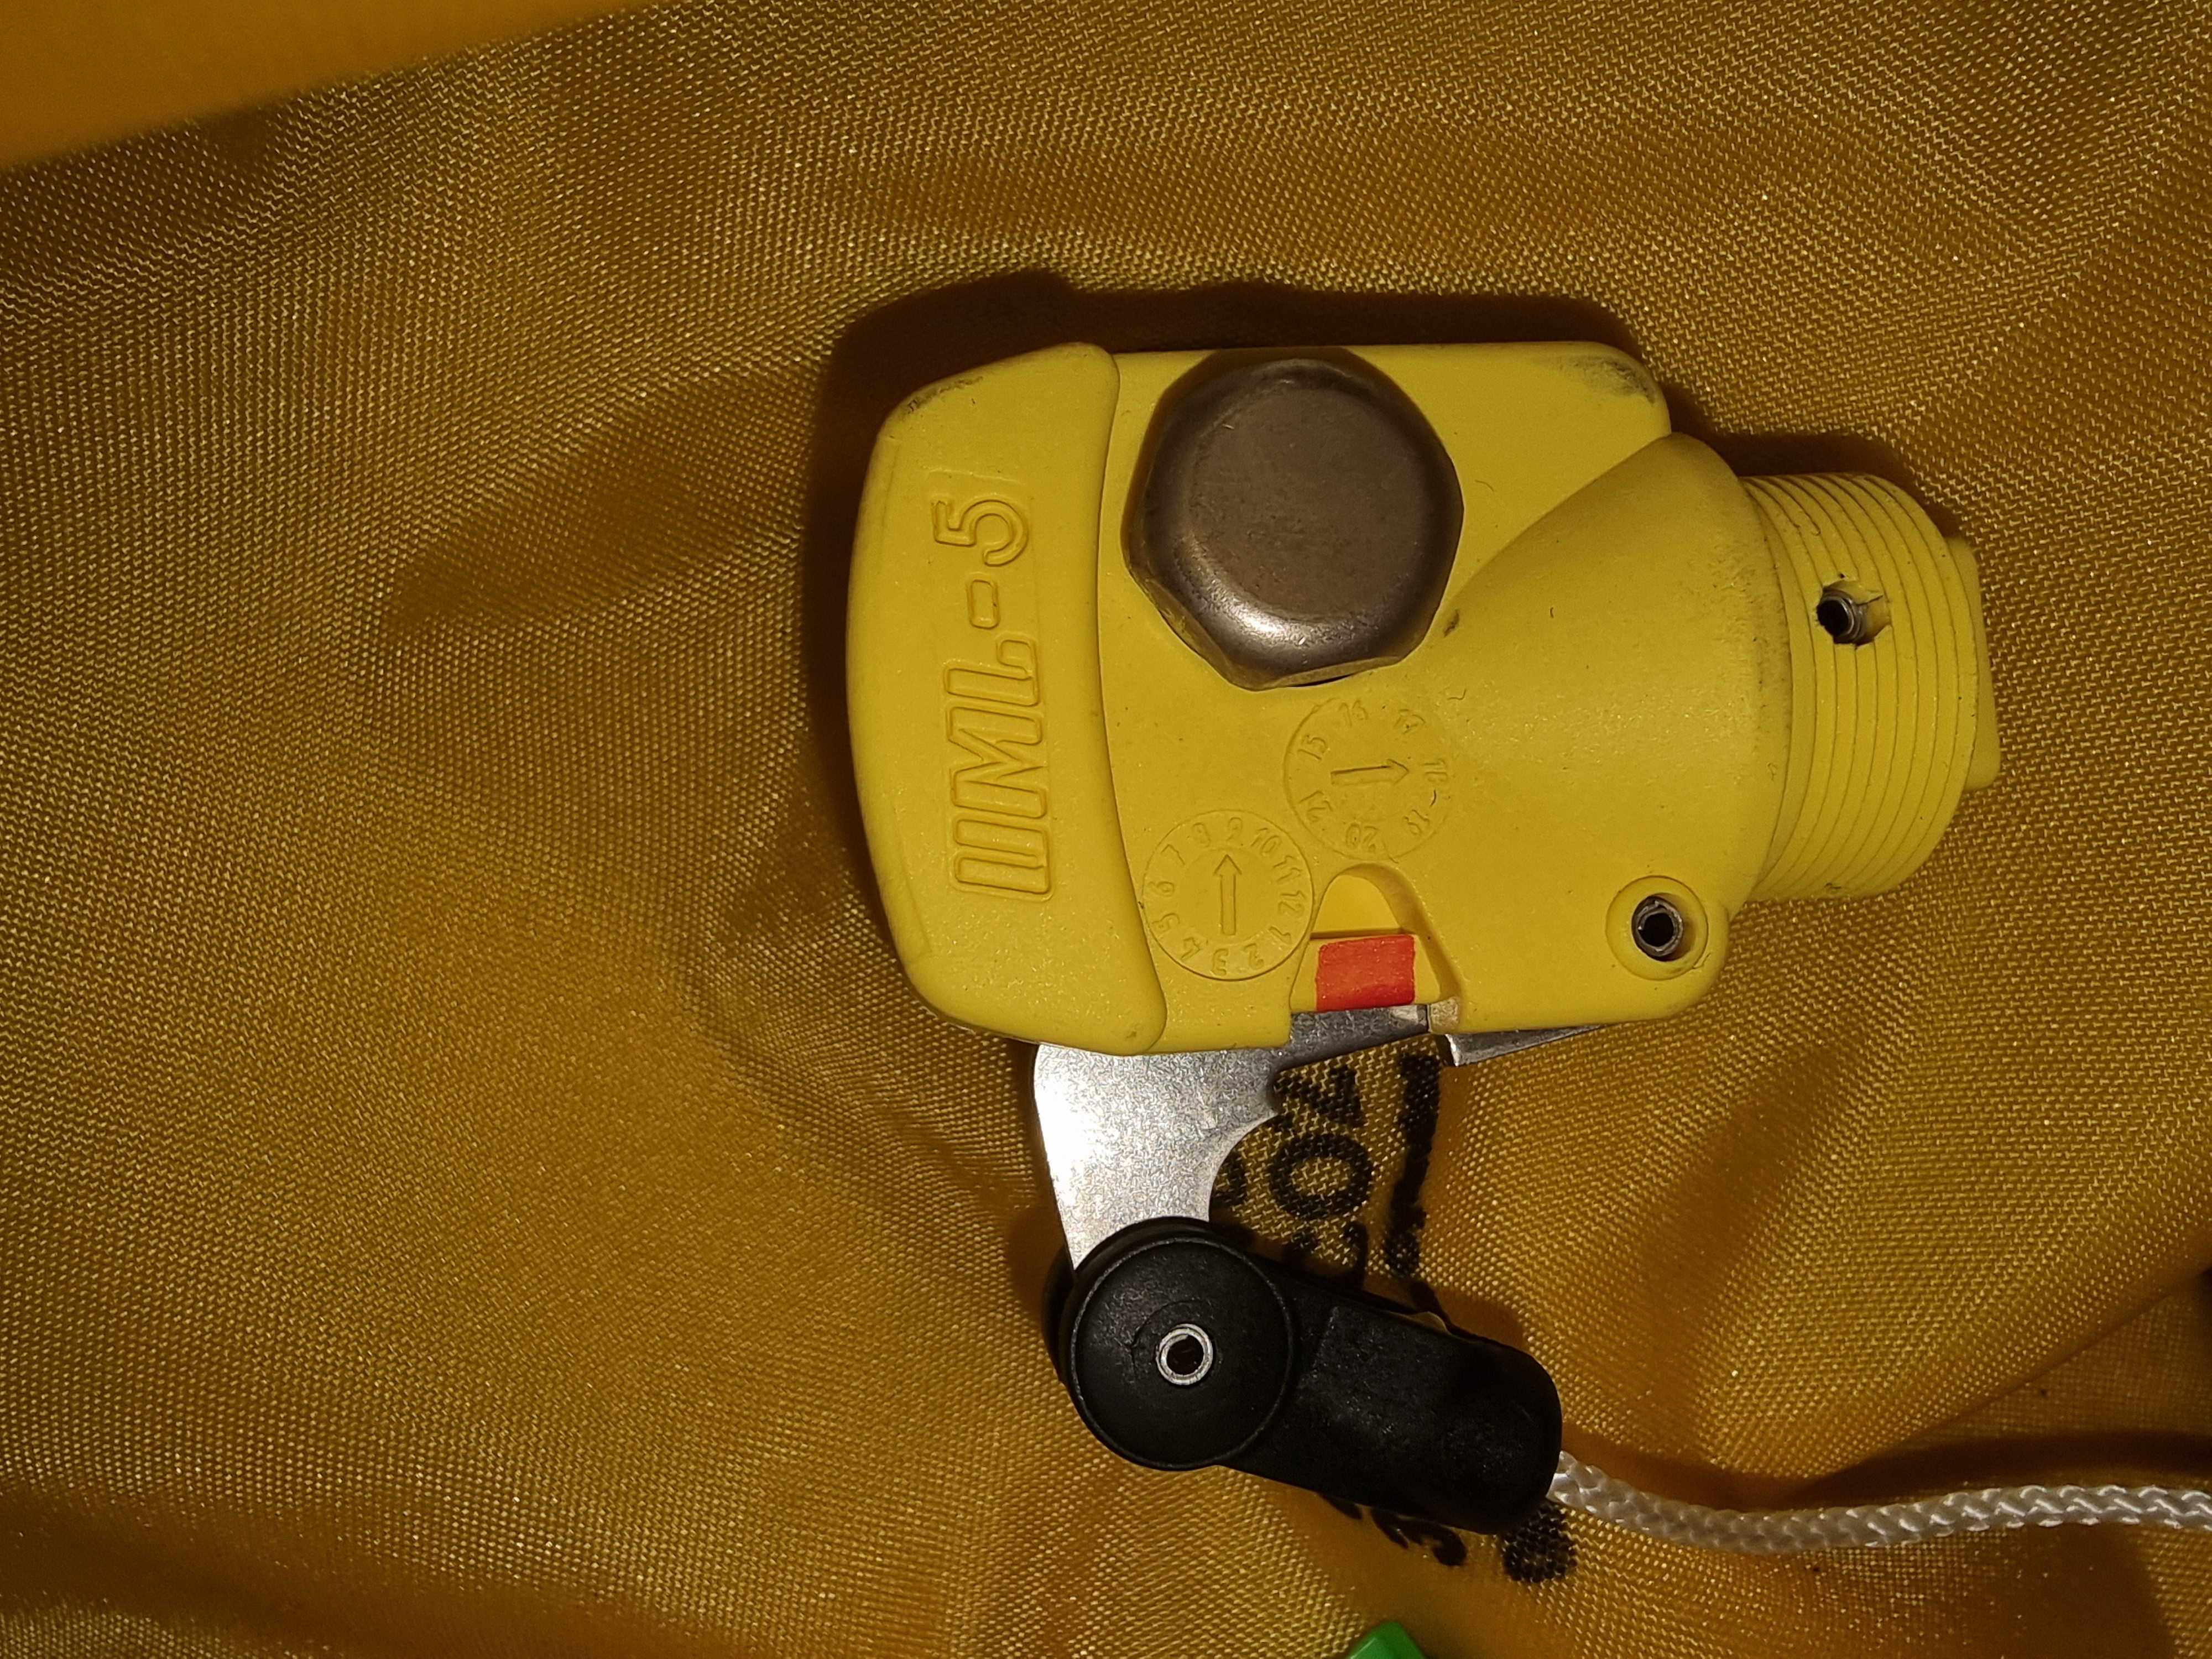
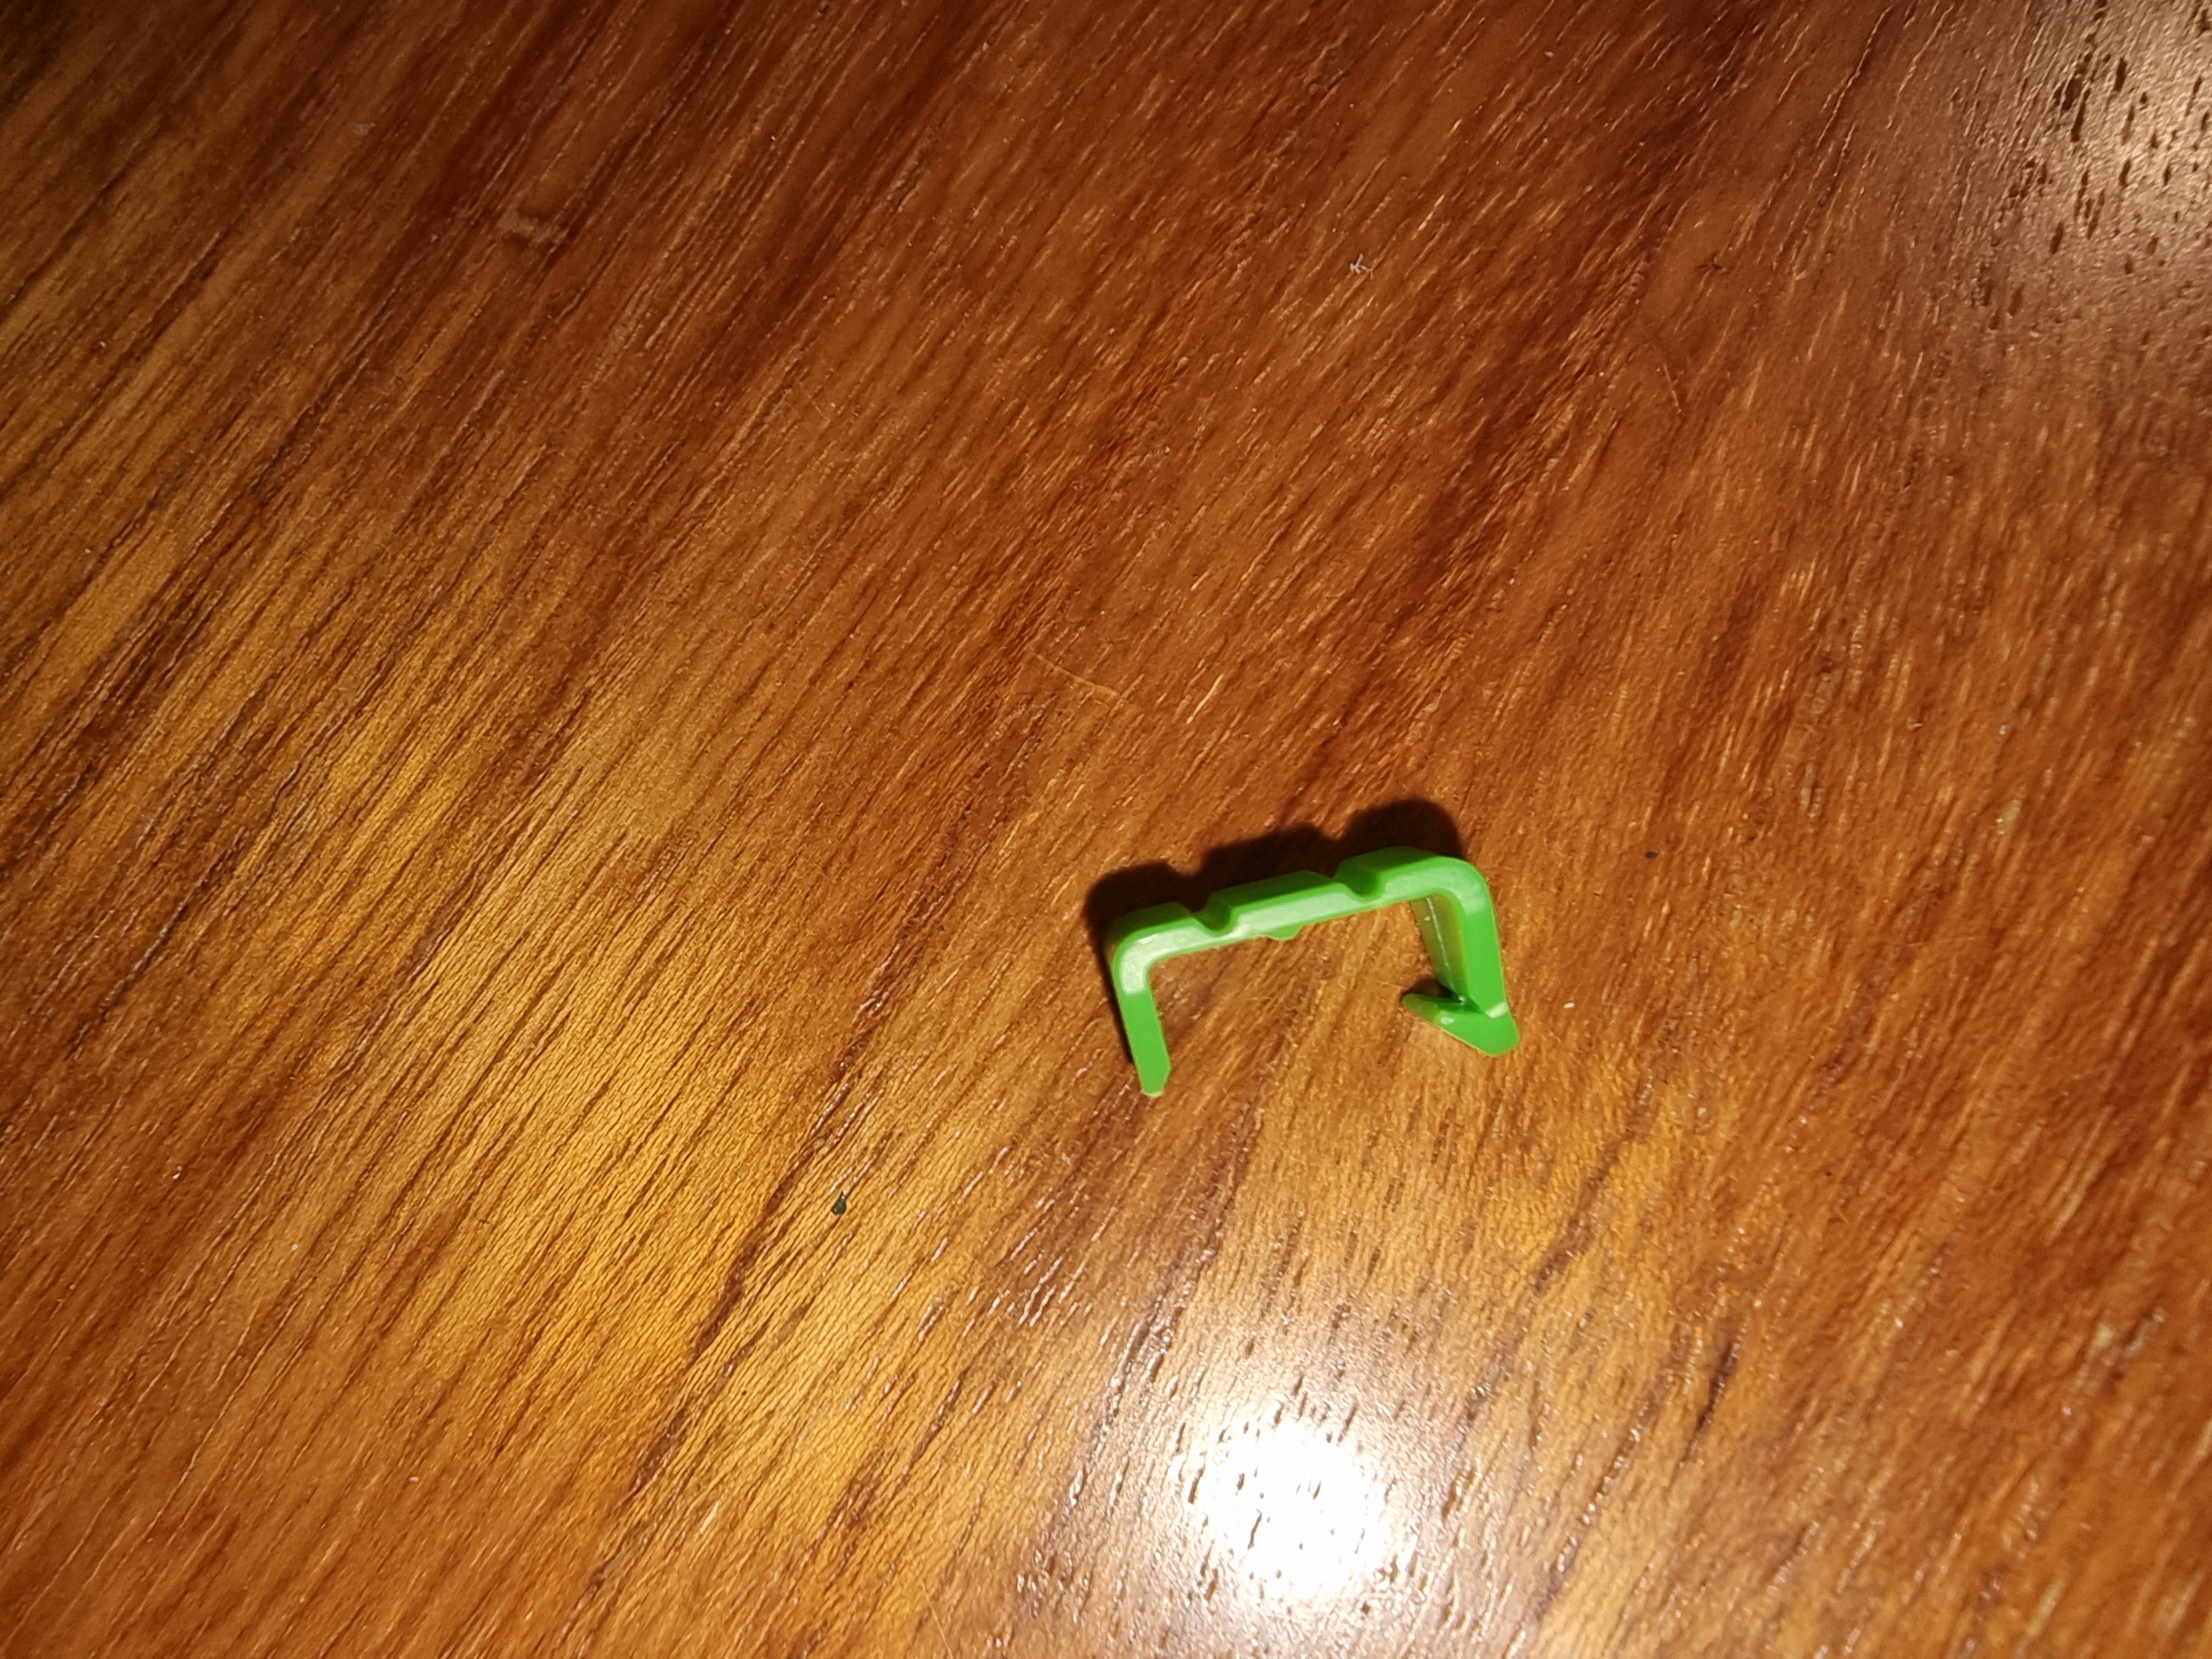
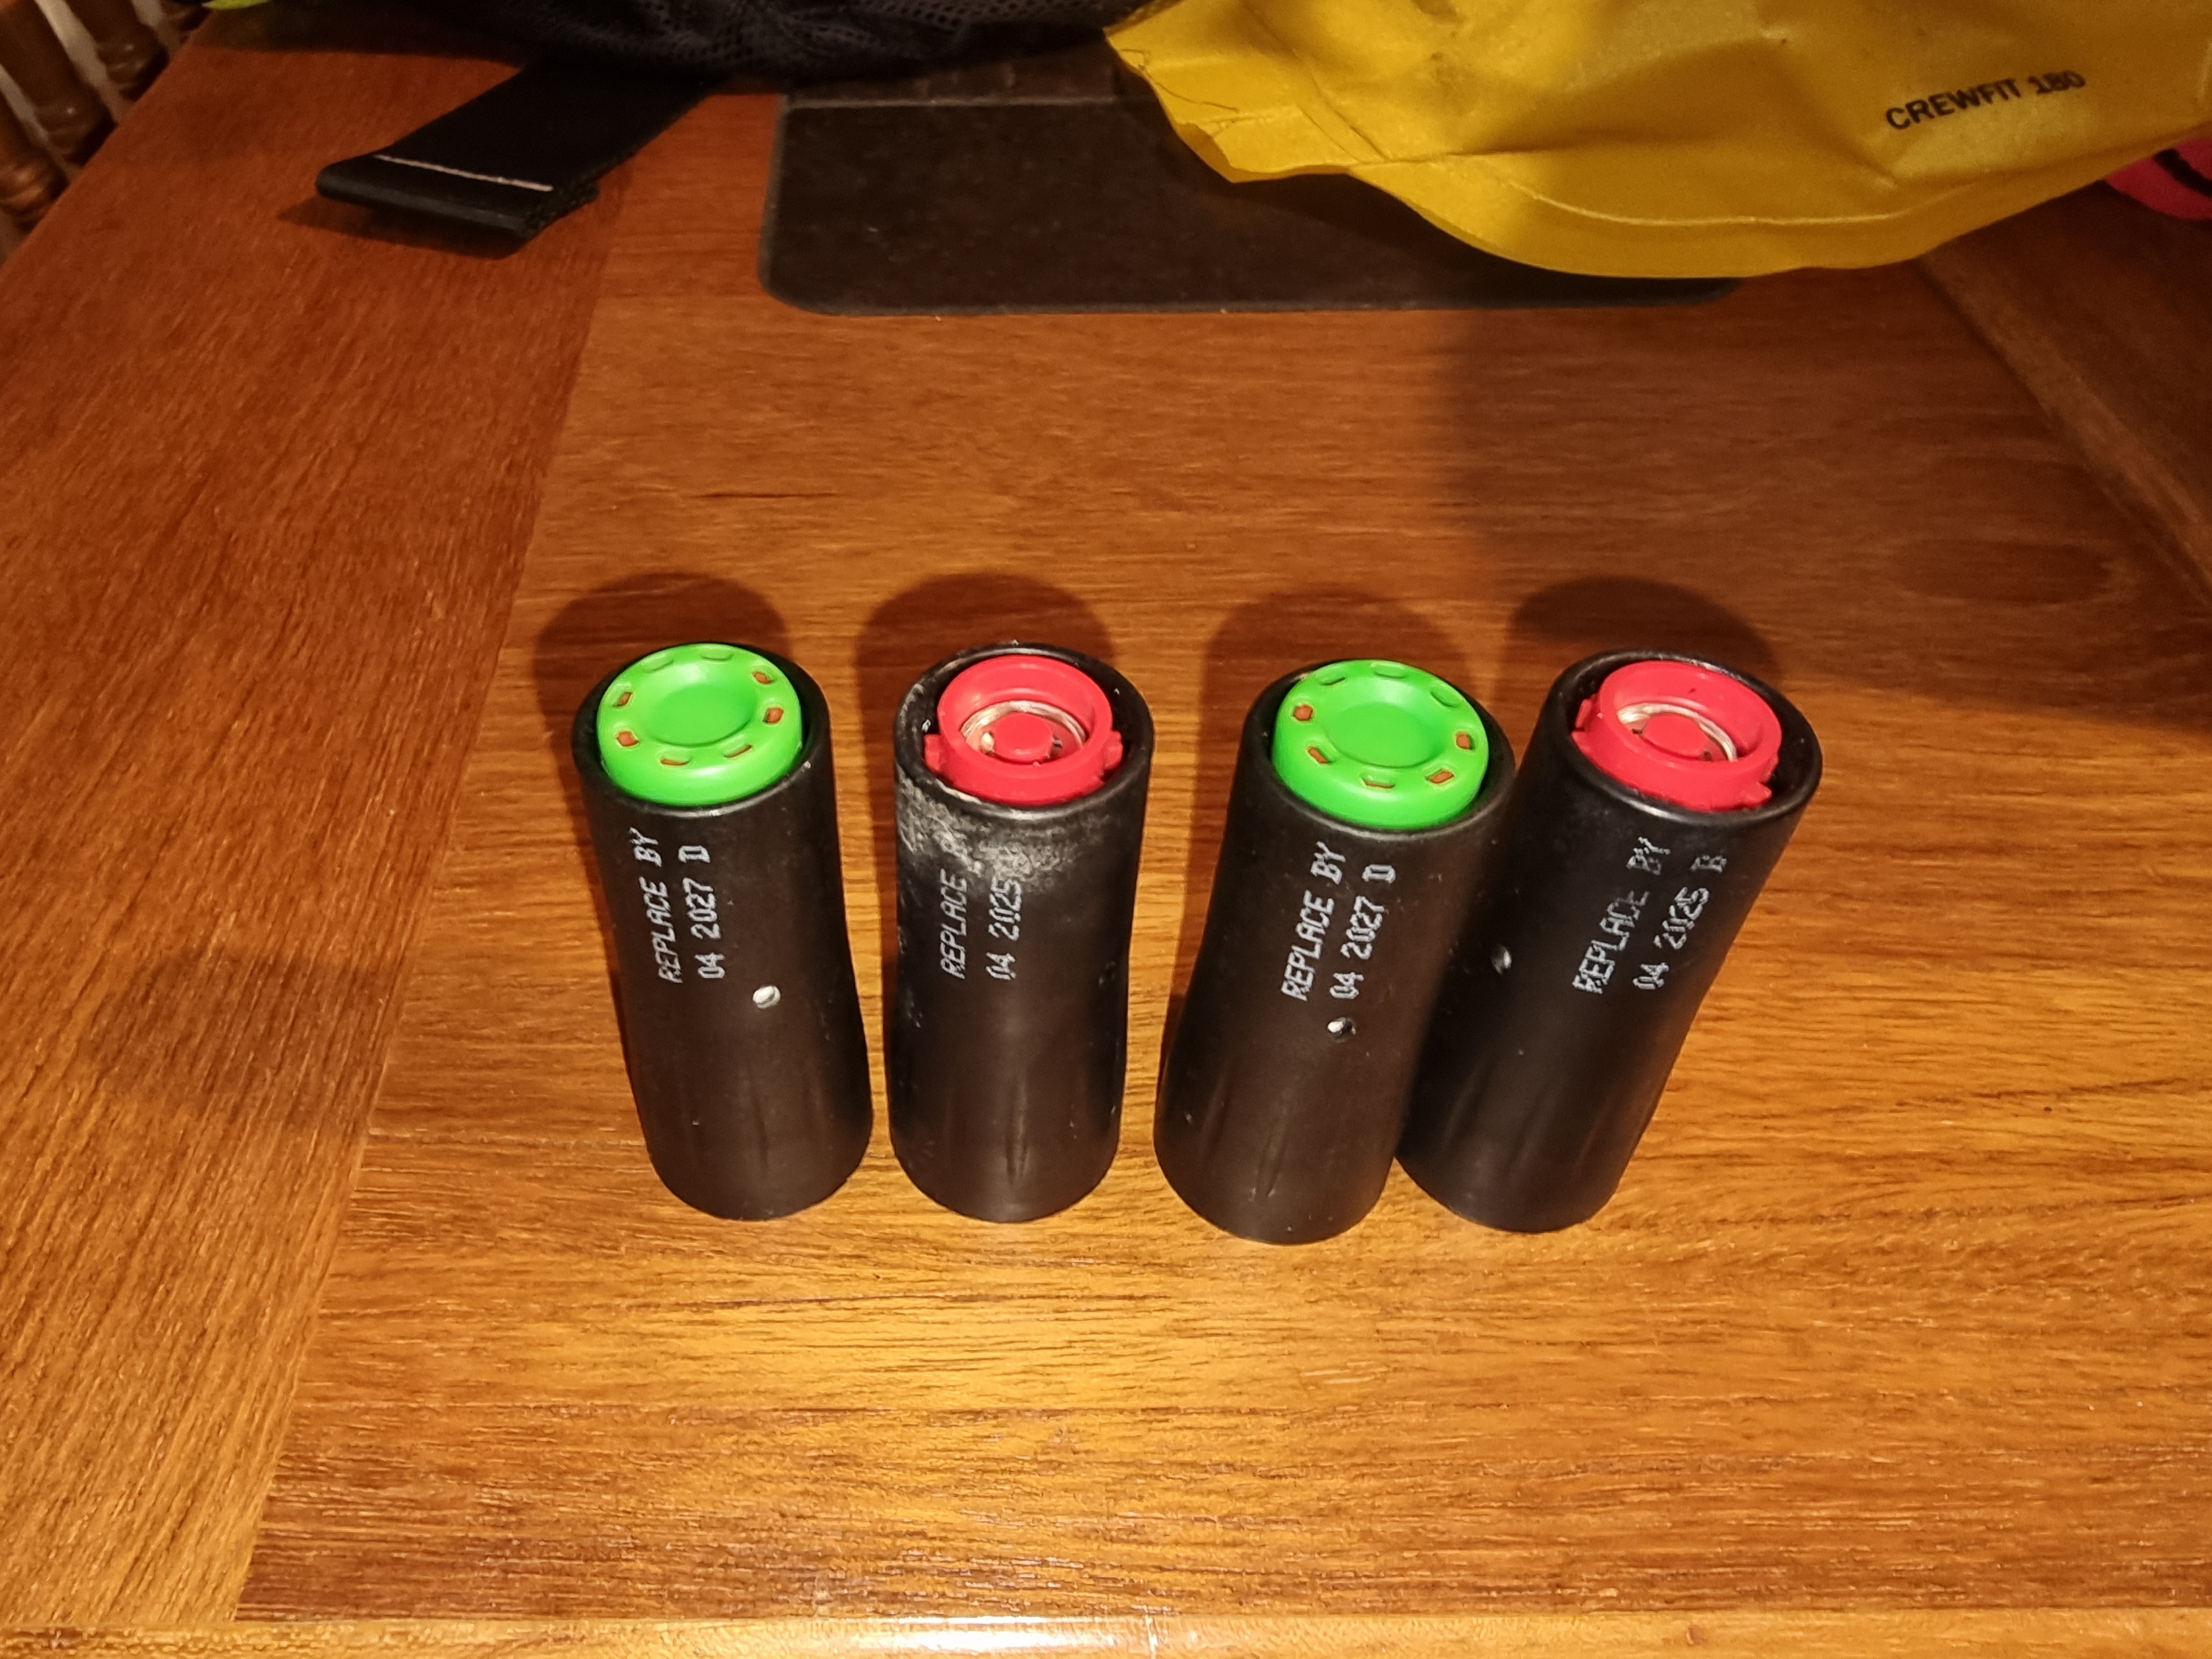
This system has a visible side retaining/indicator clip and a separate automatic activation cartridge. The green side clip is checked for presence and correct attachment. When it is missing, the red warning area underneath is visible. The automatic cartridge also has its own indicator and a printed replacement date.
Green clip present
Check that the required green retaining clip is seated and undamaged. This check is separate from verifying that a correct full CO₂ cylinder and in-date automatic cartridge are installed.
Green clip missing — red exposed
The photograph was deliberately staged on an already condemned lifejacket by removing the green clip. Its absence is a stop/check condition; it does not, by itself, prove precisely why the clip is missing.
Automatic cartridge: green or red
For the photographed cartridge, a green end indicator shows the unactivated condition and a red indication shows an activated or otherwise unacceptable condition. A green indicator alone does not prove that the cartridge is in date or fitted.
Green versus red — cartridge status
The cartridge end indicator provides a straightforward check: GREEN = not fired. RED = fired. Also check that the cartridge is correctly fitted and within its marked replacement date.
Manufacturer information: UML MK5 automatic inflator — indicator guidance.
UML-5 retaining clip, indicator and cartridge examples
INSPECTION SECTION 08
Oral tube, whistle, light and other fitted features
Check the oral inflation tube, protective cap, whistle, light, sprayhood and other items actually fitted to the jacket. Confirm that dated accessories remain within their specified service or replacement periods and that essential attachments are secure.
Oral inflation tube
Check the tube, valve housing and protective cap are present, clean and visibly undamaged. Do not insert objects into the valve.
Whistle, light and sprayhood
Check that the whistle is secured and, where fitted, the light and its date or status indicator, sprayhood and other required items are present and serviceable.
Harness and correct fit
Inspect any harness, lifting loop or other approved attachment. Ensure the jacket is the correct size, with waist and crotch straps correctly adjusted.
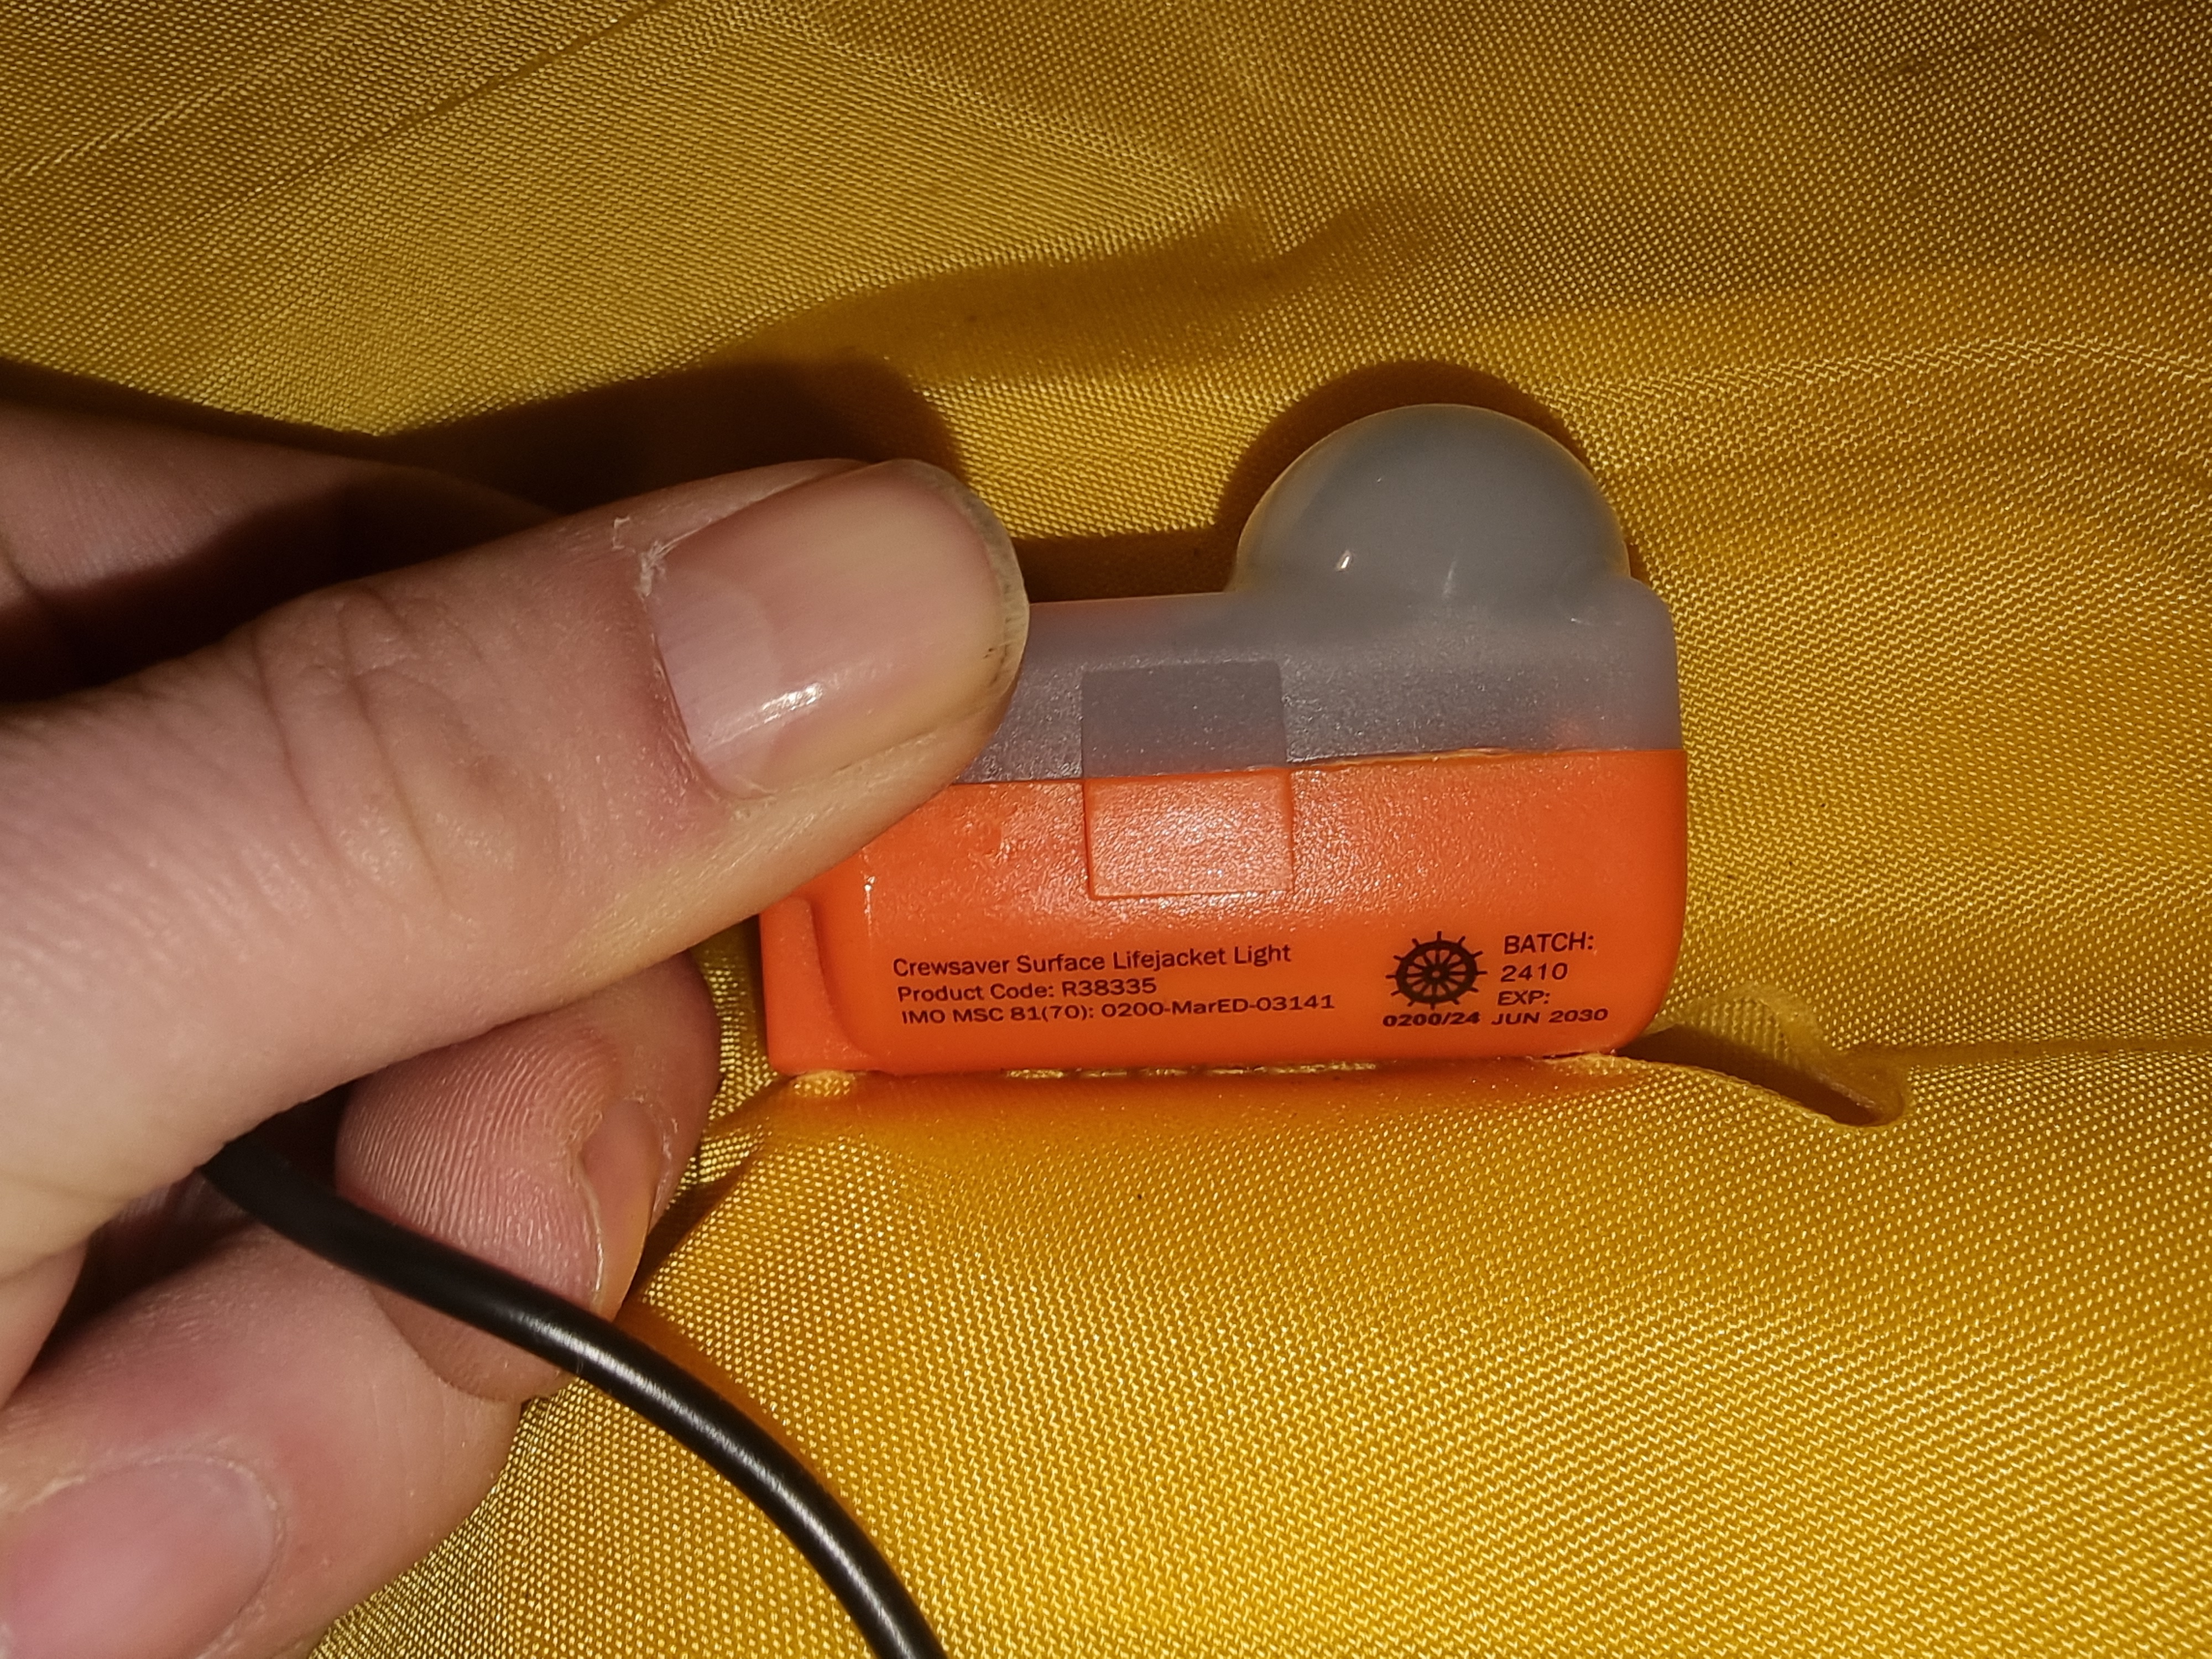
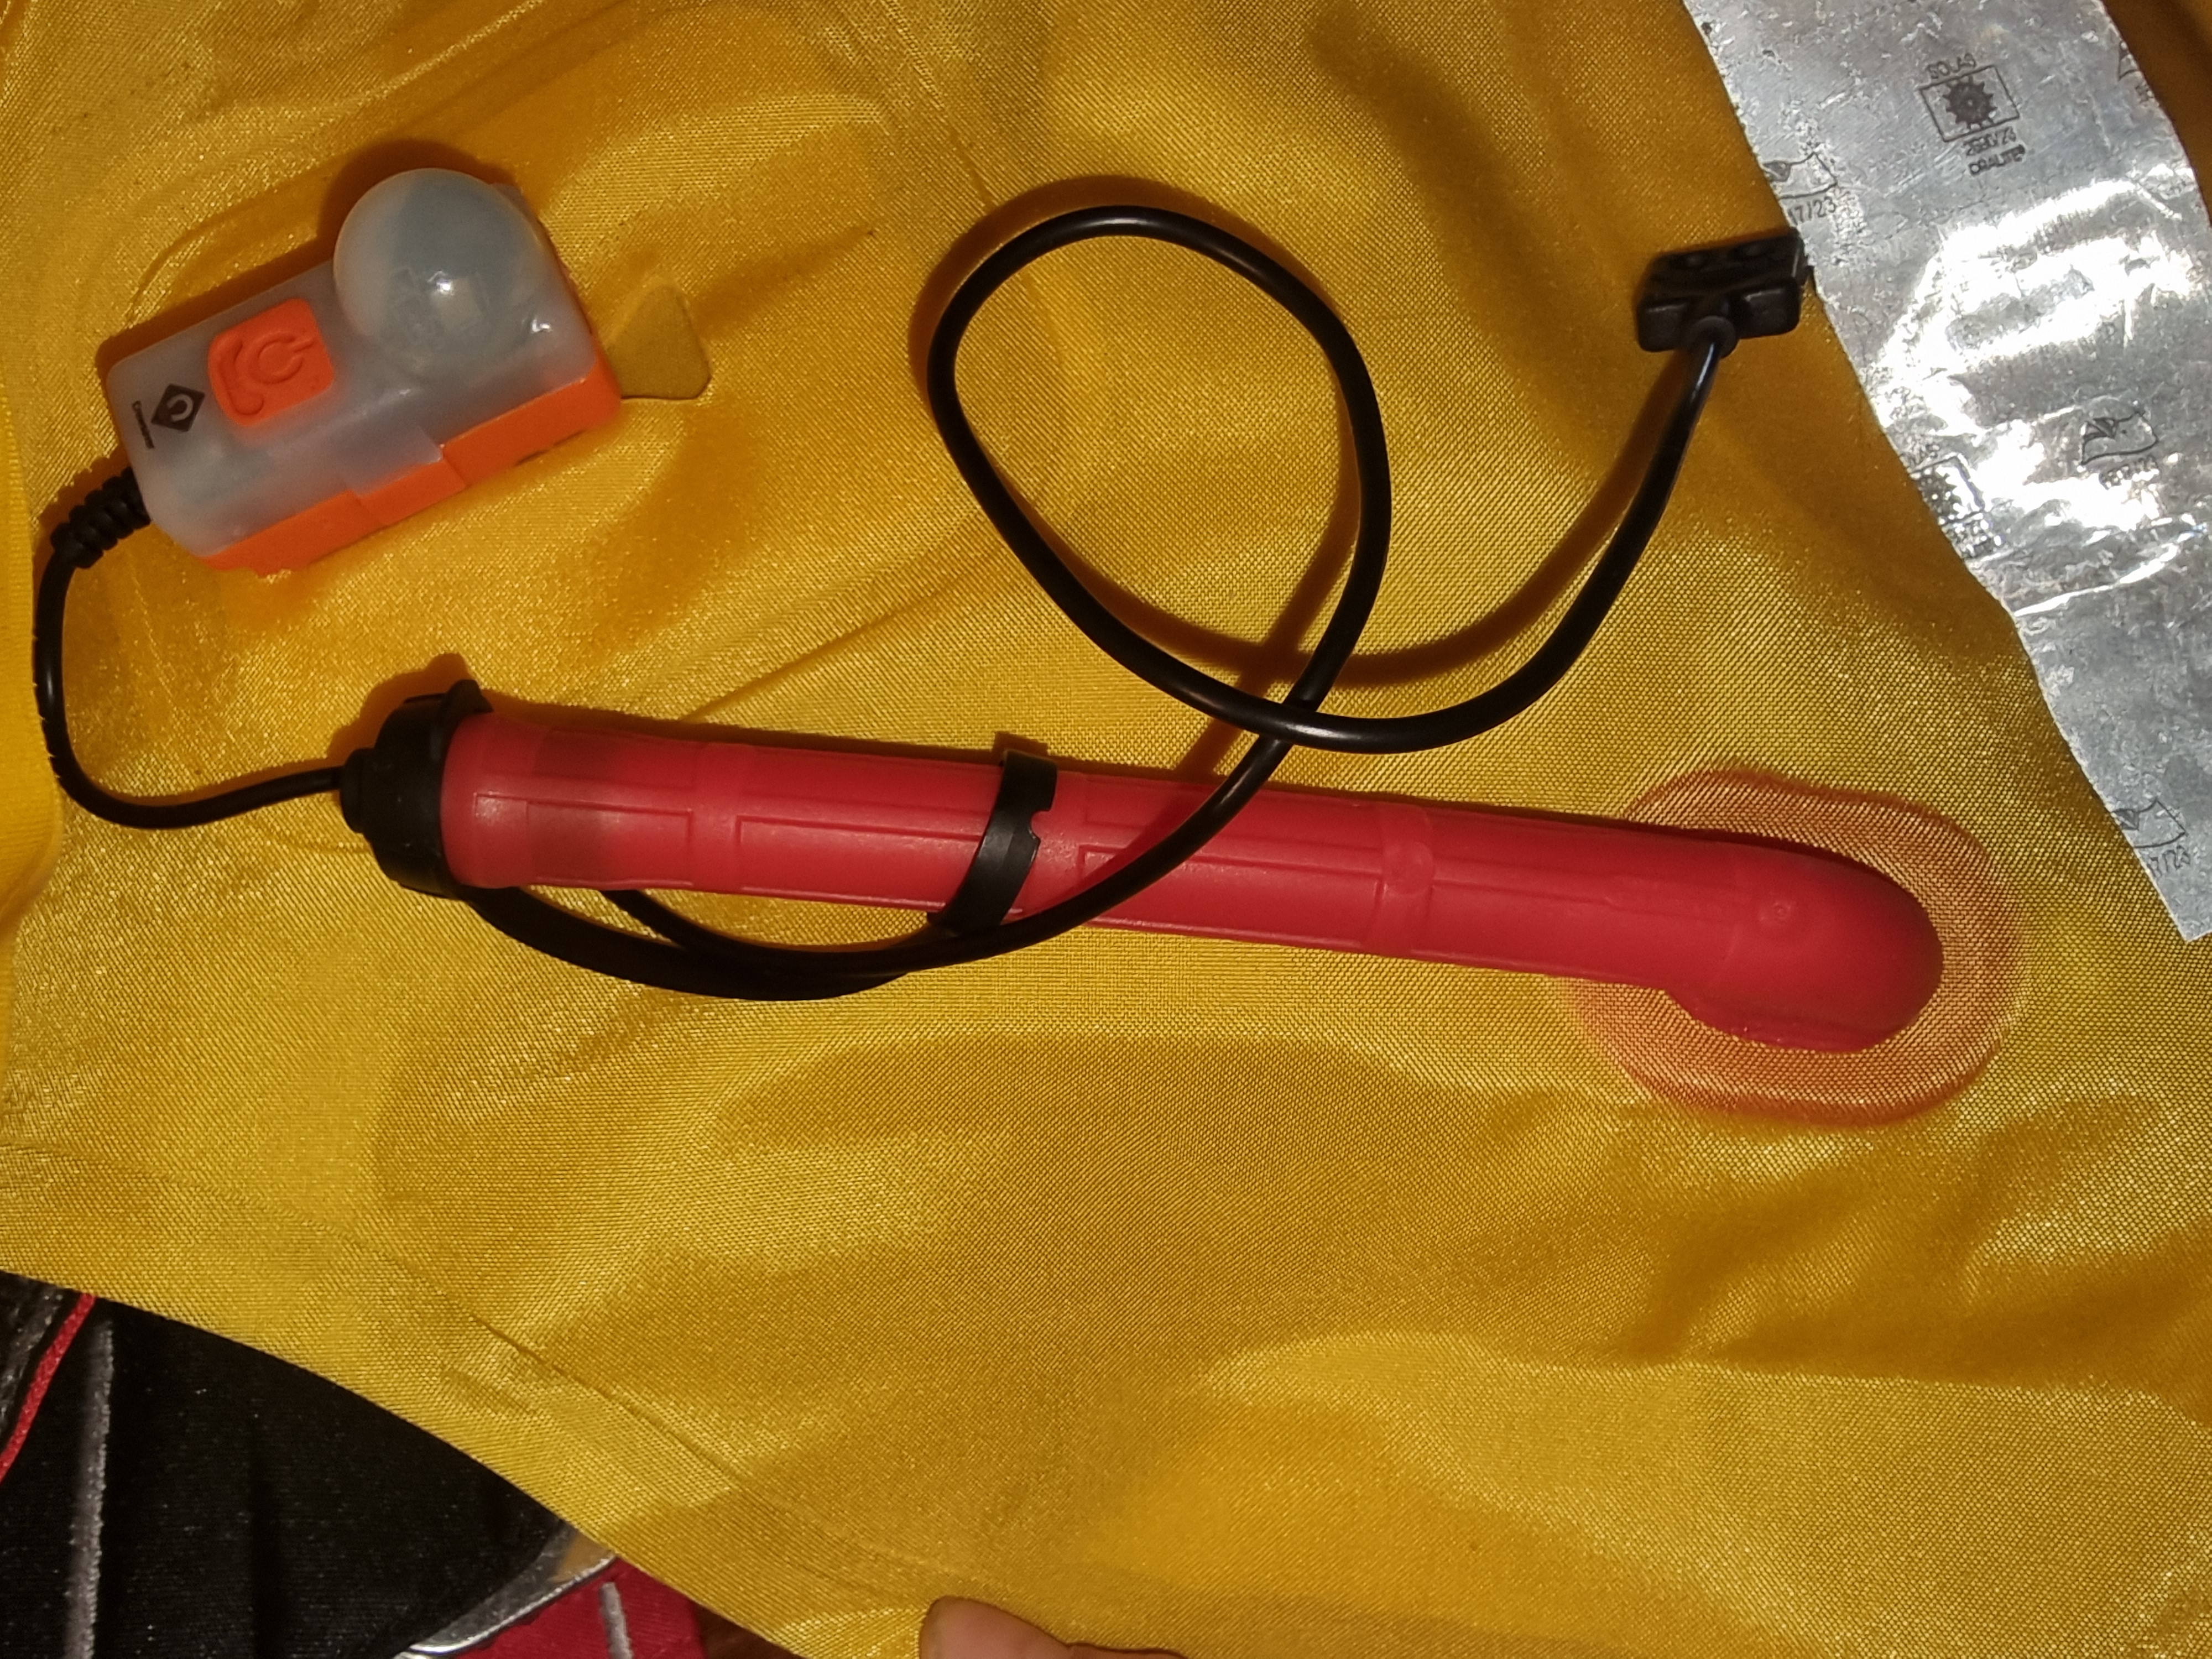
Lifejacket light, oral inflation tube and whistle
Light and expiry date
Check that any fitted light is attached, undamaged and within its marked expiry date. Follow the manufacturer's test and activation procedure where applicable. Do not assume a light is serviceable just because it is present.
Oral inflation tube
Check the tube and cap, connection to the bladder and accessibility. An untrained wearer should not disassemble or manipulate the valve to 'test' it during a routine pre-use check.
Whistle and attachment
Check that the whistle is present, reachable and securely retained. Also inspect its attachment point and any other fitted safety accessories.
Real accessories and expiry-markings
INSPECTION SECTION 09
Opening, concertina folding and correct repacking
Repacking is safety-critical. Where the specific model's instructions require concertina (accordion/map-style) folding, use that method rather than rolling, cramming or randomly folding the bladder. The sequence is model-specific; do not attempt it without the manufacturer's instructions and necessary competence.
Open carefully
Follow the manufacturer's guide. Keep the cylinder, inflator, pull cord, oral tube and accessories in the correct locations. Do not dismantle the inflation system.
Concertina folds
Many inflatable lifejackets are packed using concertina (accordion/map-style) folds. Do not roll the bladder up or make arbitrary folds. Exact fold direction and sequence vary by model.
Close correctly
Follow the prescribed zip or hook-and-loop closure sequence, keeping the bladder and pull cord clear of trapped areas and leaving the manual pull handle accessible.
Stop if uncertain
If you do not have the correct folding diagram or training, do not guess. Arrange appropriate competent repacking or servicing.
INSPECTION SECTION 10
Labels, expiry dates and RISE NFC records
A lifejacket may appear sound but be unsuitable if its identity, dated components or required service status cannot be verified.
Manufacturer label
Check make, model, buoyancy rating, size, serial number and other essential identification.
Service and expiry dates
Verify the service due date and any time-limited firing cap, cartridge, light or other fitted component against the manufacturer's schedule and operational requirements.
RISE NFC tracking
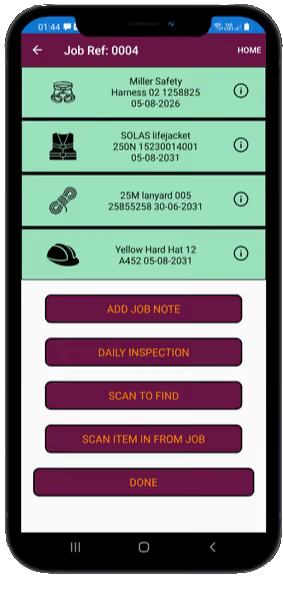
Scan the tag, where fitted, to check current status, service history, inspections, photographs and reported defects. Digital records complement—not replace—physical checks.
Under Monitor
A competent inspector may document a specific acceptable condition where manufacturer criteria permit continued use, with reference photographs. Any worsening, uncertainty or rejection criterion means removal from use.
INSPECTION SECTION 11
What to do when a lifejacket fails a check
The point of a pre-use check is to keep suspect equipment out of the water. Do not improvise repairs or return a lifejacket to circulation simply because a defect appears minor.
01 · REMOVE
Stop using or issuing the lifejacket if it is damaged, improperly armed, out of date, incorrectly packed or of uncertain condition.
02 · IDENTIFY
Mark it clearly DO NOT USE and keep it separate from jackets available for issue.
03 · RECORD
Record the fault and photographs in your equipment register or the RISE NFC system, if used.
04 · REFER
Arrange assessment, replacement, rearming, repair or servicing by an appropriately competent or manufacturer-approved provider where required.
Further guidance: RNLI lifejacket care · RYA lifejacket guidance · MCA Non-SOLAS servicing bulletin. Always follow the manufacturer's specific instructions. Image placeholders intentionally await suitable lifejacket photographs; they are not examples of assessed equipment.